
You're trying to schedule a video call, bouncing between Outlook and Teams, and somehow your meeting invitation ends up without the Teams link. It's one of those small tech frustrations that can make you want to throw your computer out the window.
The thing is, adding Teams meetings to Outlook isn't actually that complicated once you figure out which version you're using. Microsoft has three different Outlook platforms, and they all handle Teams integration differently. If you follow the wrong instructions, you'll waste time looking for settings that don't exist.
Let me walk you through the exact steps for each platform, plus some fixes for when things go sideways.
Understanding How Teams and Outlook Work Together
Before we jump into the how-to, it helps to understand what's happening behind the scenes. Teams meeting integration basically creates a bridge between your Outlook calendar and Microsoft Teams. You don't have to switch between apps anymore when you're scheduling video calls.
The catch? Each version of Outlook does this differently, and Microsoft made some big changes in 2025 that caught a lot of people off guard.
Here's the breakdown:
- Classic Outlook (Desktop): Uses a COM add-in that you might need to enable manually. Takes about 3-5 minutes to set up.
- New Outlook (Desktop): Has Teams built right in. Super simple – maybe 1-2 minutes.
- Outlook Web: Also has it built in, works the same way across all devices.
One important thing to know: New Outlook for Windows dropped support for the old Teams add-in. It's all native now, which is actually better once you get used to it.
For professionals looking to maximize their Outlook experience beyond Teams integration, explore our comprehensive guide on Microsoft Outlook tips to boost productivity with advanced features and workflow optimization strategies.
Setting Up Teams in Classic Outlook
If you're using the traditional desktop version of Outlook (the one that comes with Office), you'll need to do a bit more work, but you get more control over how everything works.
Getting to the Add-ins
First, you need to find where Outlook keeps its add-in settings:
- Open Outlook and click the File tab
- Click Options in the left sidebar
- Select Add-ins from the list
- Look for "Microsoft Teams Meeting Add-in for Microsoft Office" – it might be in either the active or disabled list
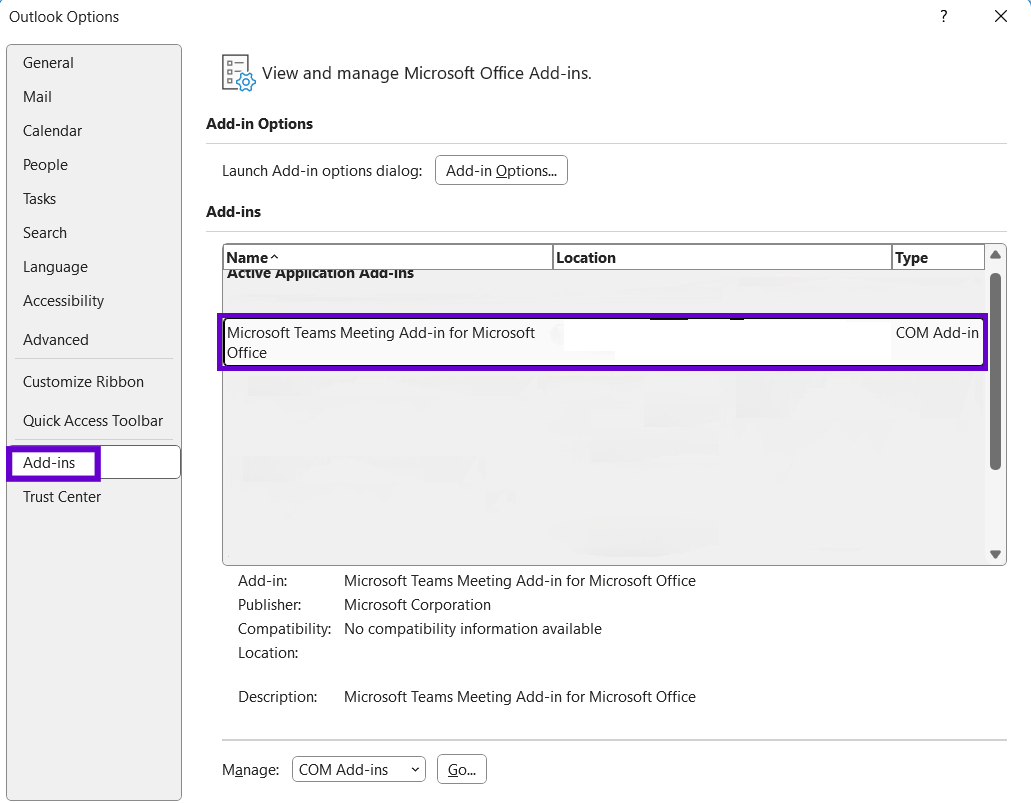
Turning On the Microsoft Teams Add-in
If you see the Teams add-in but it's disabled, here's how to fix it:
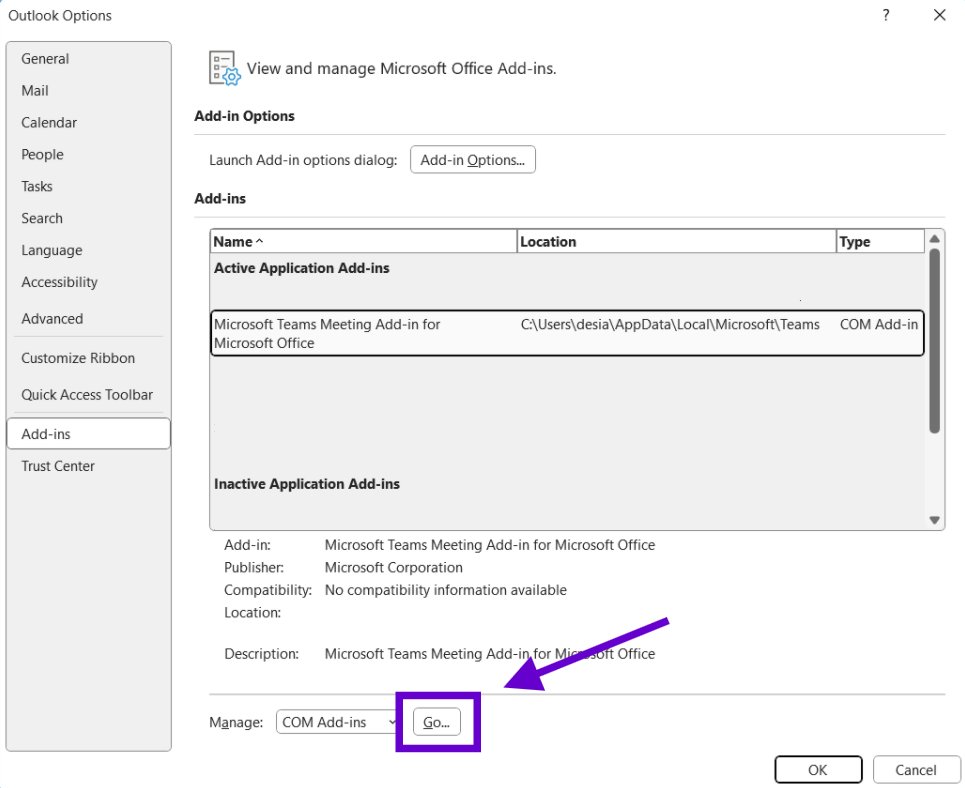
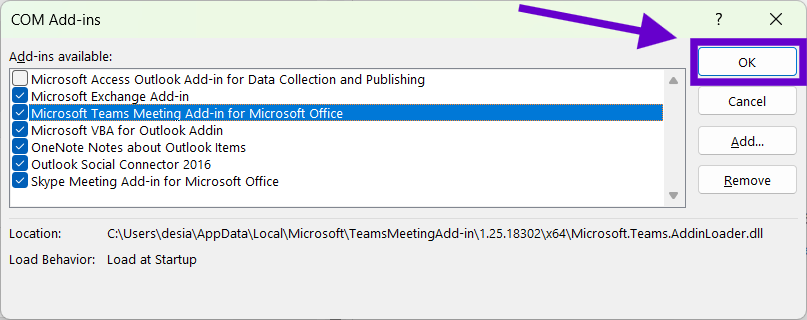
- At the bottom of the Add-ins window, choose COM Add-ins from the dropdown
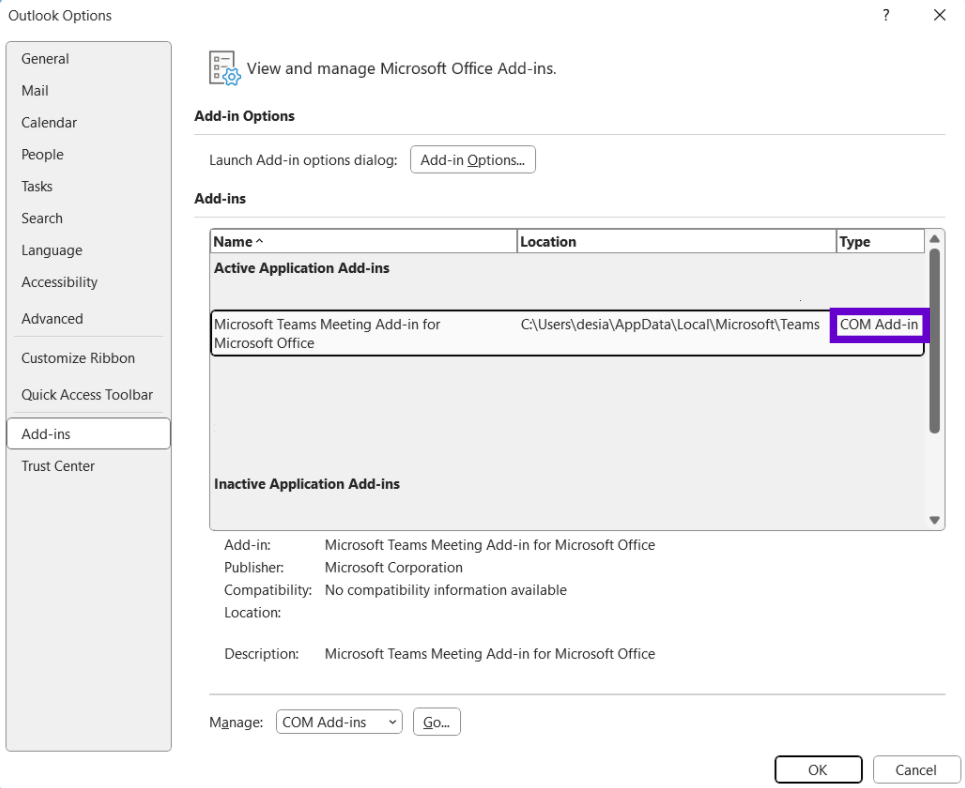
- Click Go
- Check the box next to "Microsoft Teams Meeting Add-in for Microsoft Office"
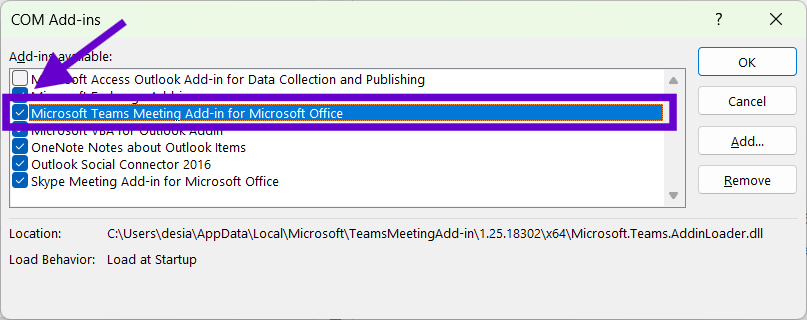
- Click OK to save the changes
- Close Outlook completely and restart it
Sometimes the add-in doesn't show up at all. This usually happens when you update to the new version of Teams. If that's the case:
- Close both Outlook and Teams
- Start Teams first – this usually reinstalls the meeting add-in
- Wait for it to show up in your Windows installed apps list
- Then restart Outlook
Making Sure It Worked
Once you've enabled the add-in, test it out:
- Go to your Outlook calendar
- Click New Meeting
- Look for a Teams Meeting button in the toolbar
If you don't see it, double-check that the add-in shows as active (not disabled), and make sure you're logged into both Outlook and Teams with the same account.
If you're interested in enhancing your Classic Outlook with additional productivity tools, check out our curated list of the best Outlook add-ins that can streamline your workflow beyond just Teams integration.
Creating MS Teams Meeting on Outlook
Now the fun part – actually scheduling a meeting:
- Open your calendar in Outlook
- Click New Meeting
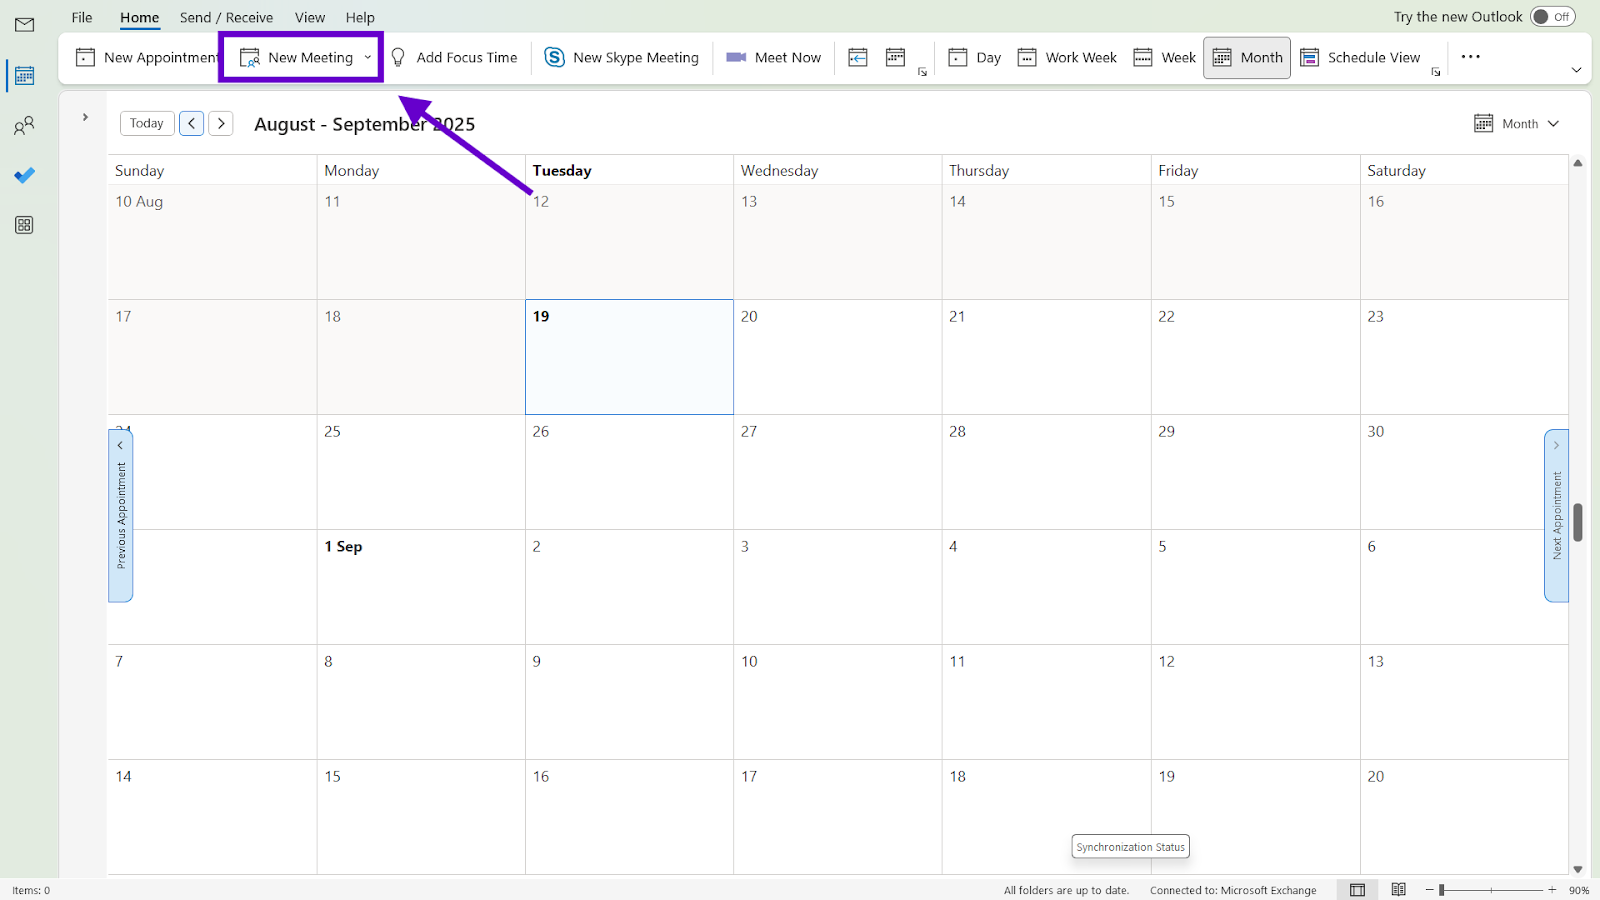
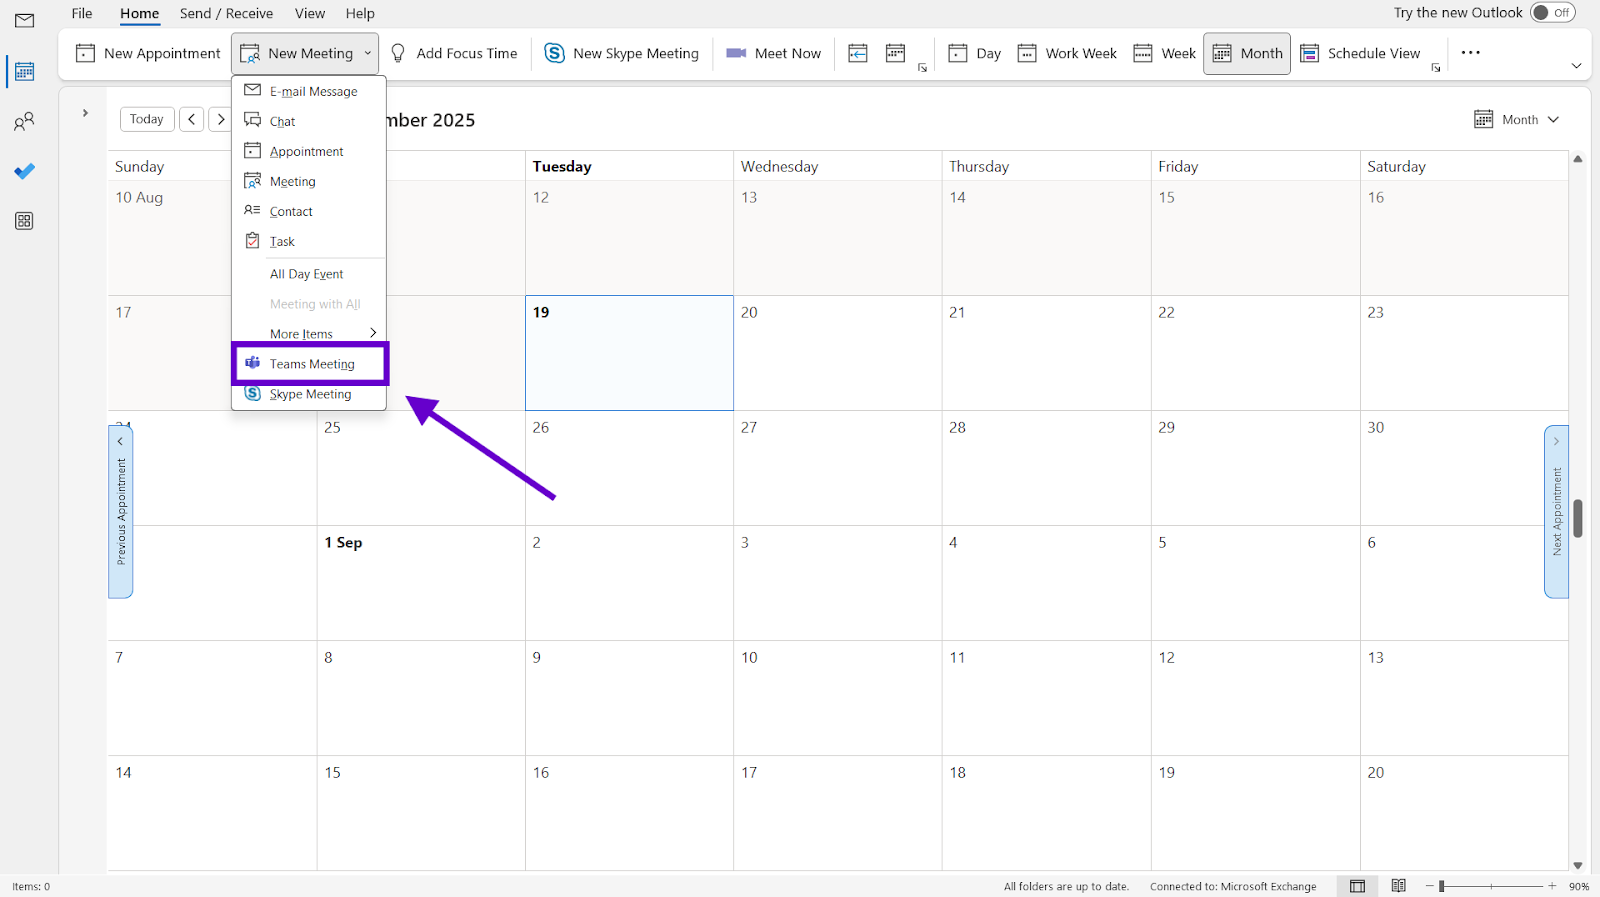
- Click the Teams Meeting button
- Fill in your meeting details like you normally would
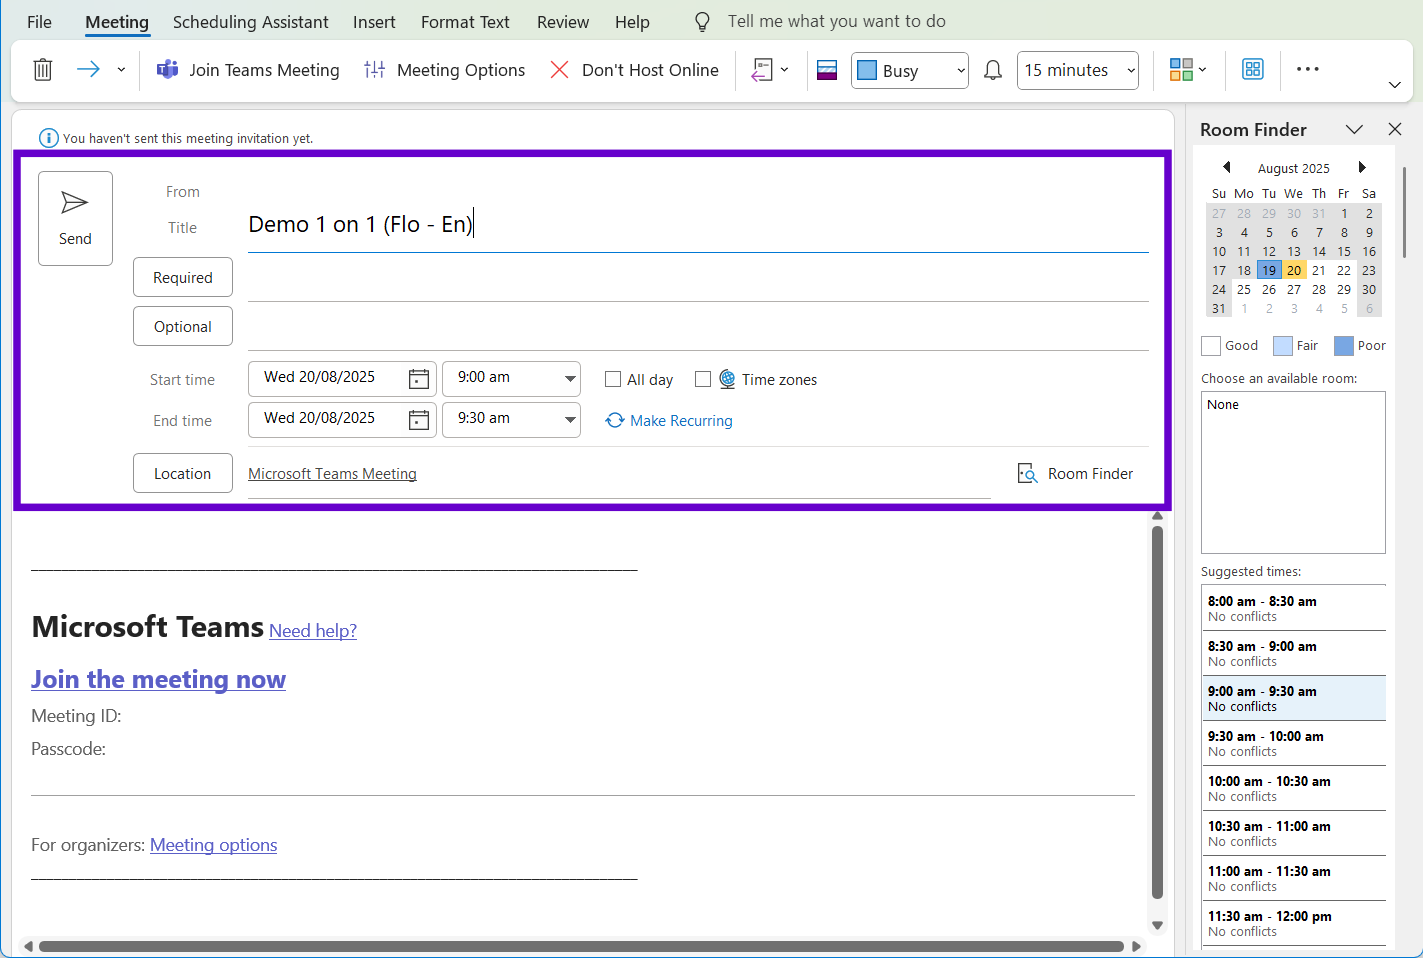
- The location automatically becomes "Microsoft Teams Meeting"
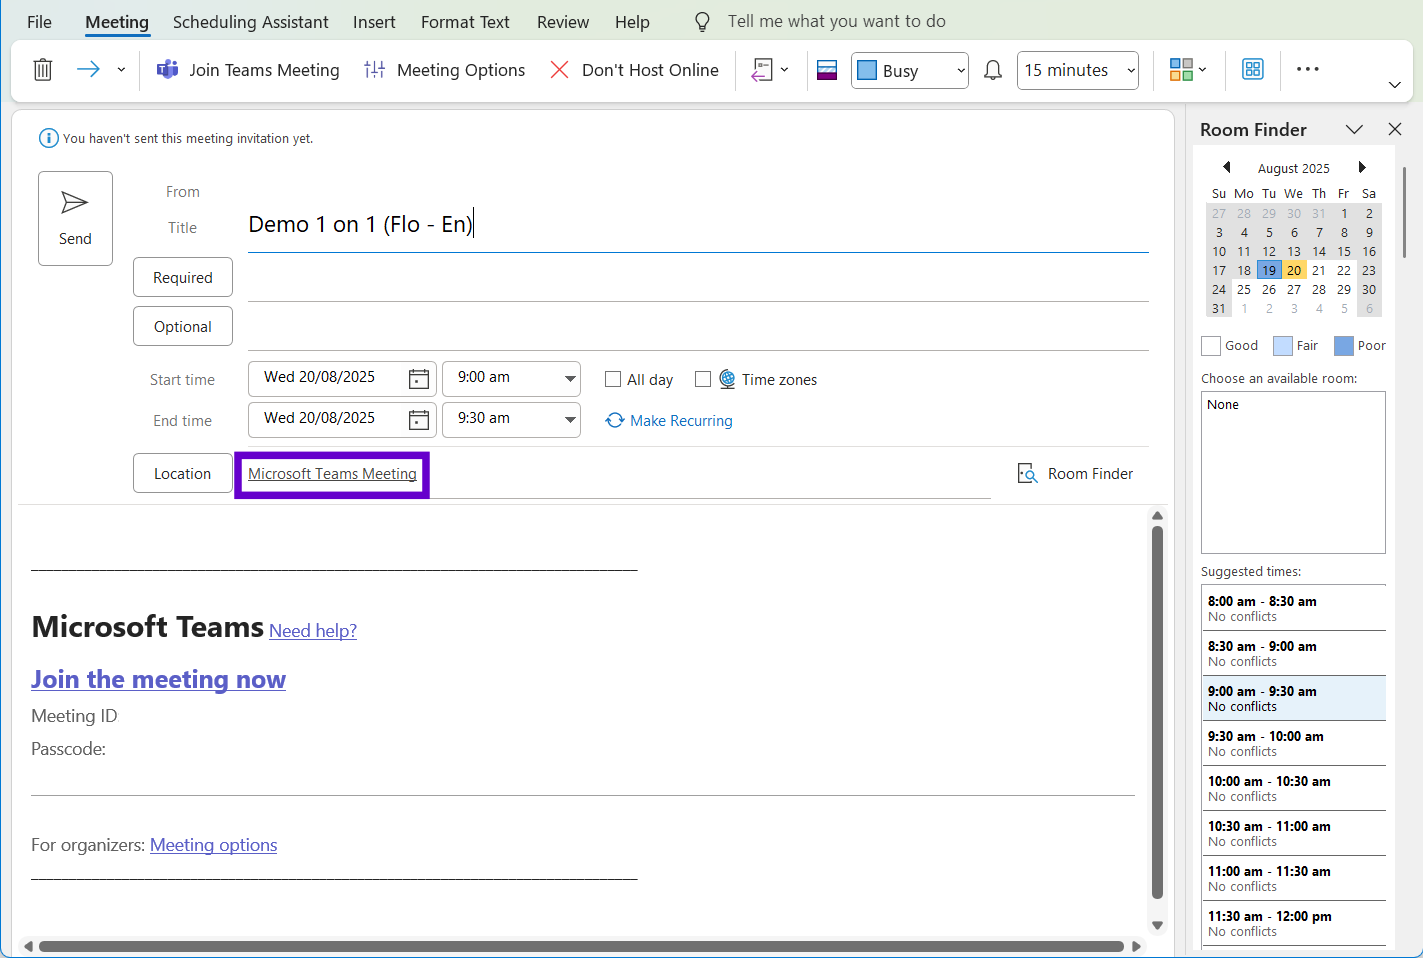
- Send the invitation
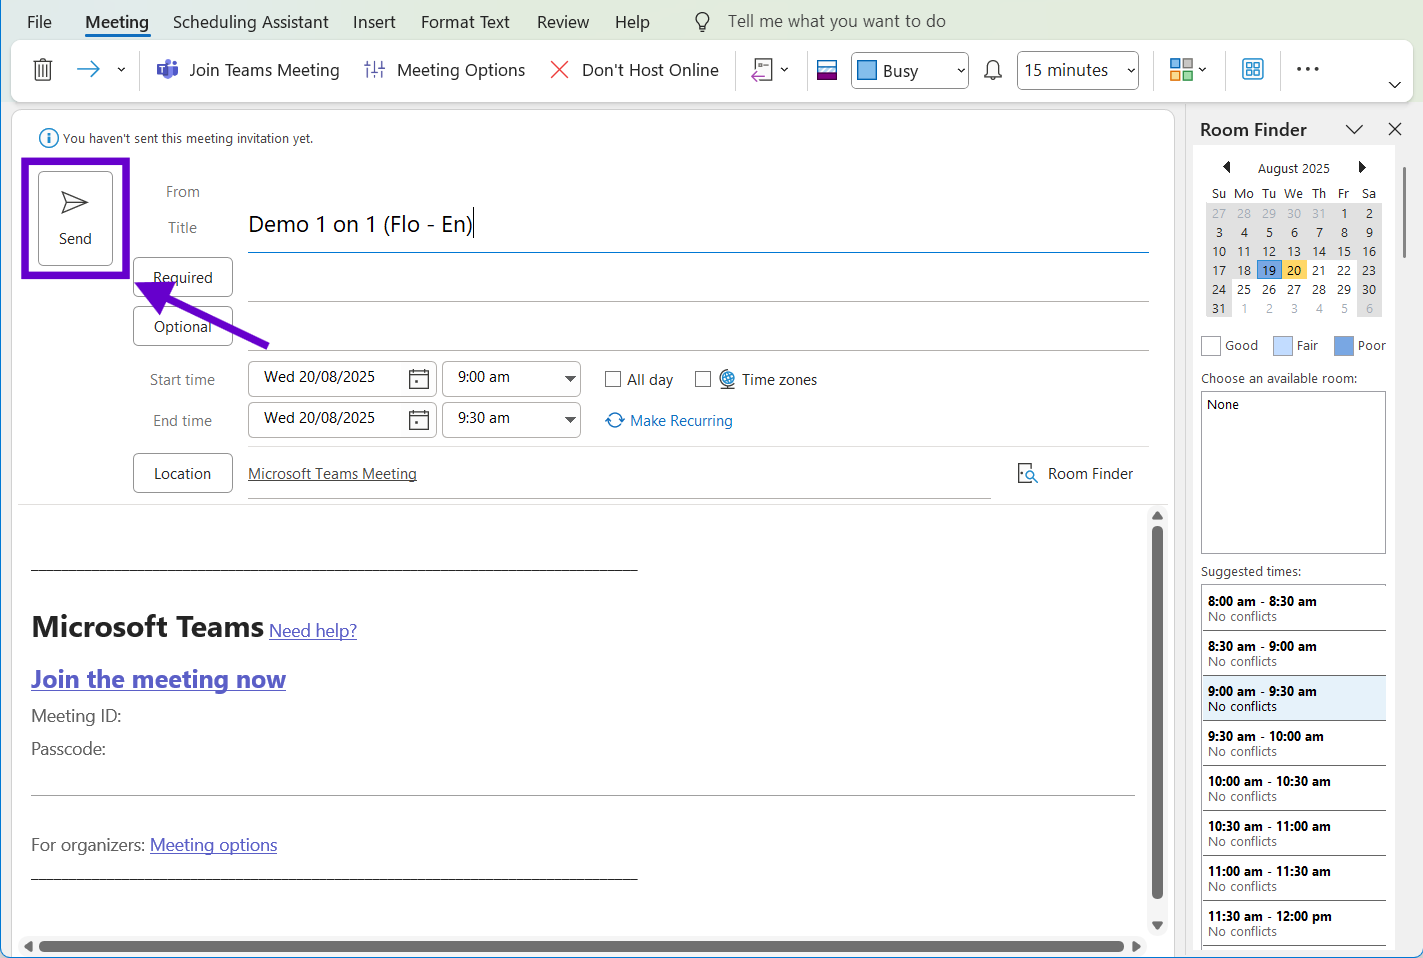
Outlook will automatically add the Teams link and dial-in information for everyone you invite.
Setting Up Teams in New Outlook
Microsoft's newer version of Outlook makes this whole process much simpler. Teams functionality is built right in, so there's no add-in to mess with.
Checking That It's Working
New Outlook should have Teams integration ready to go, but it's worth checking:
- Open New Outlook
- Go to your calendar
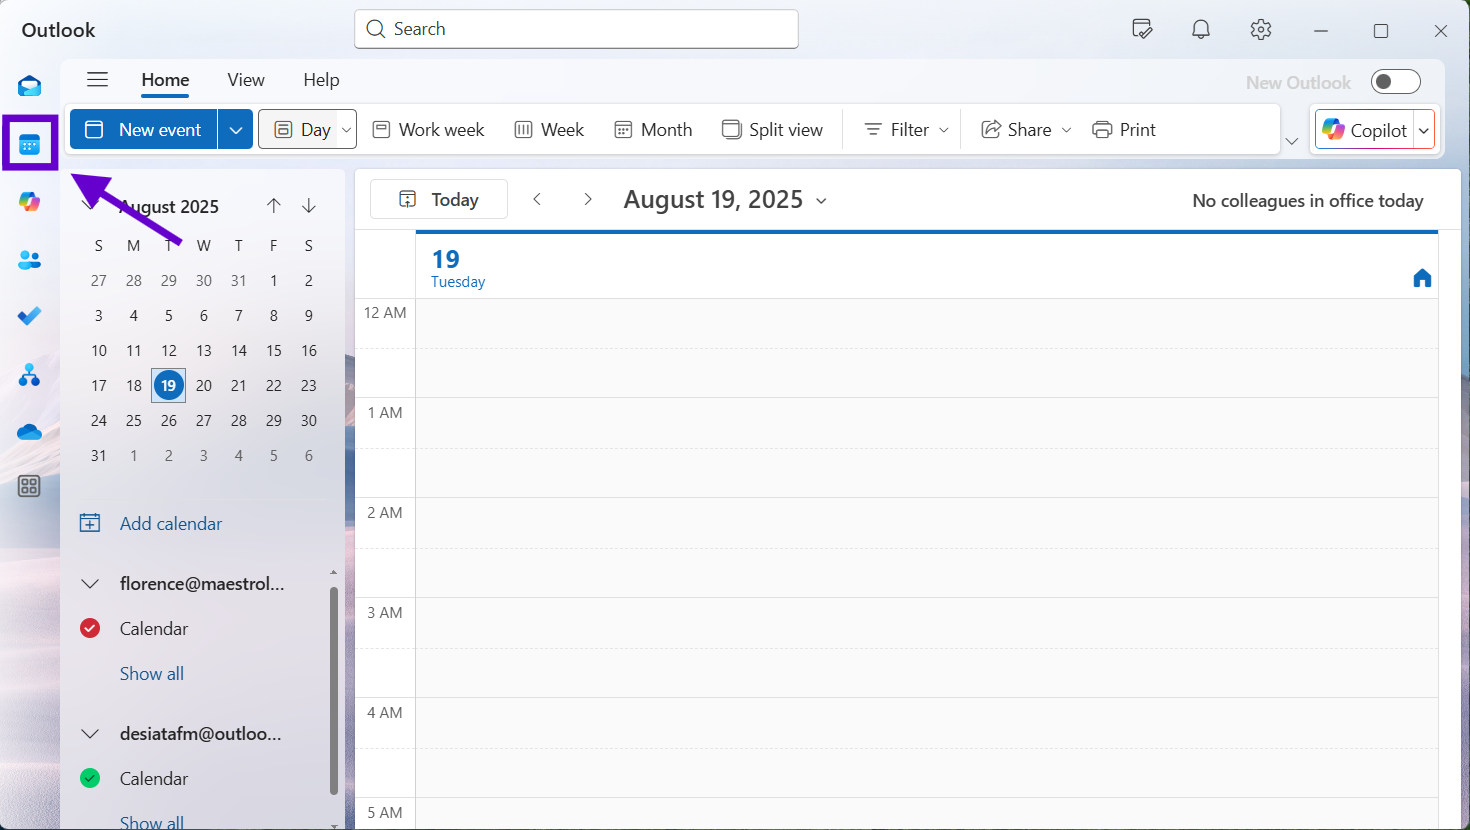
- Click New Event or New Meeting
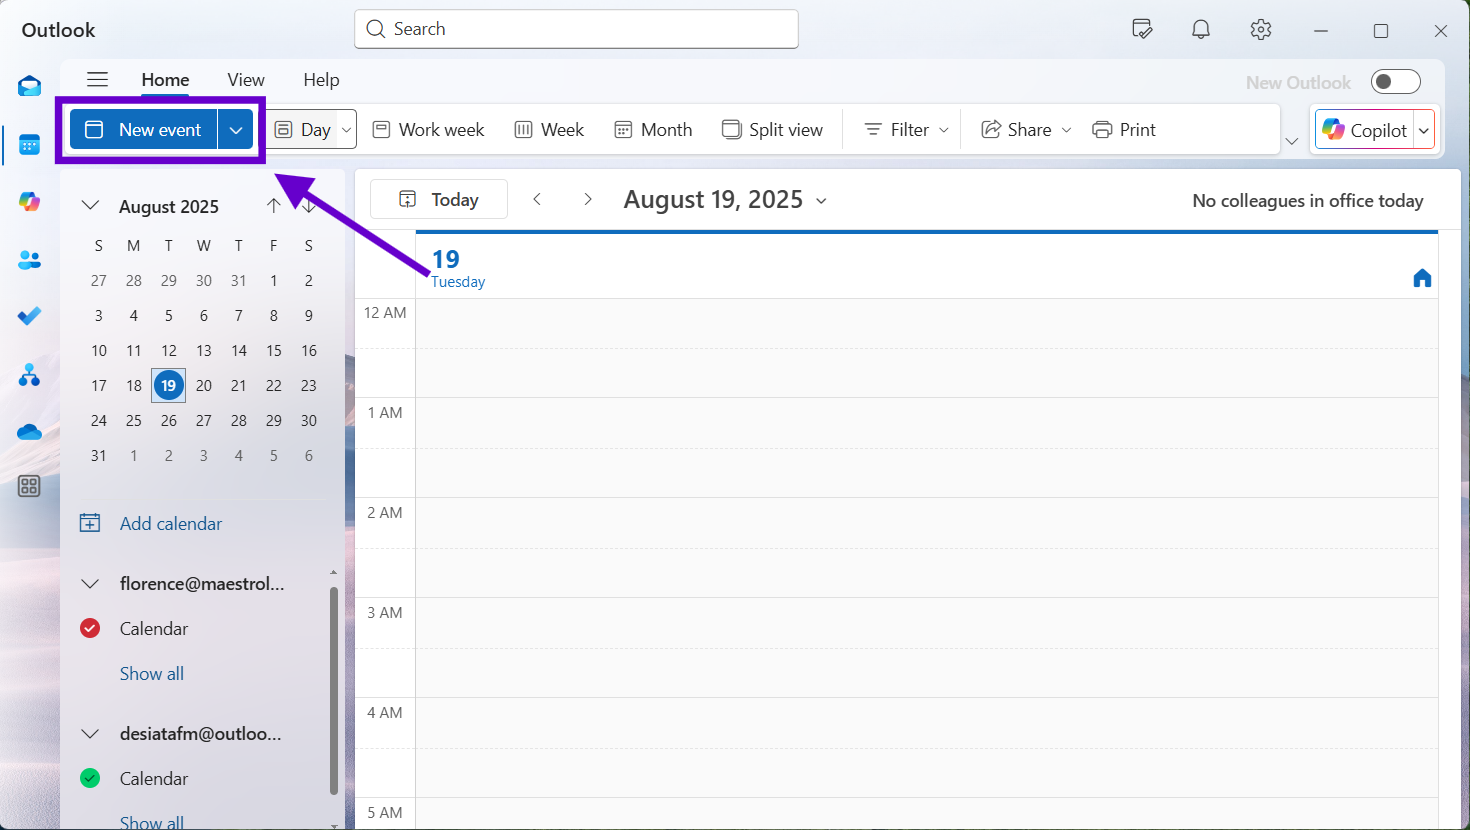
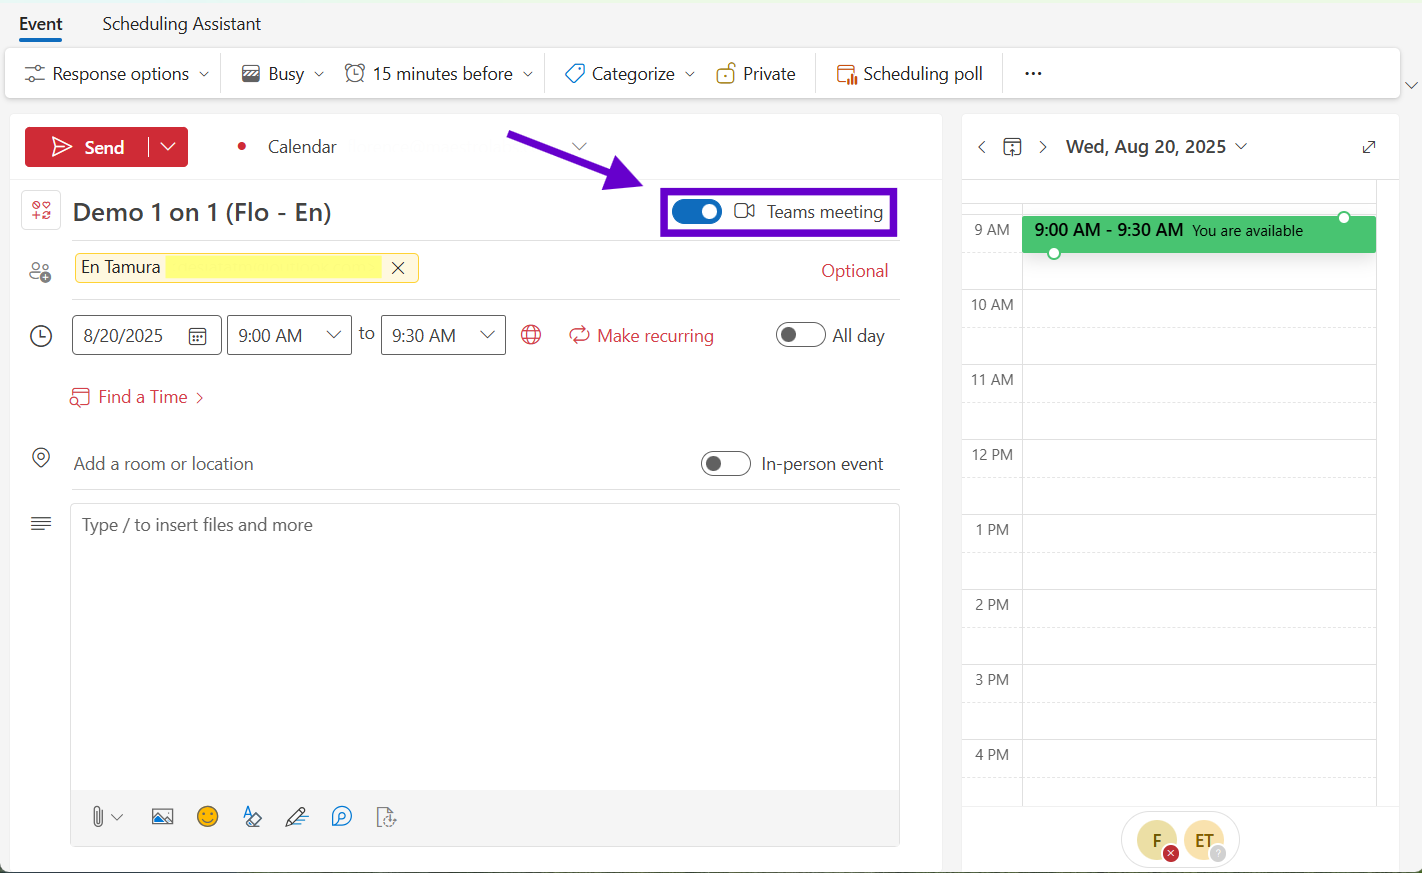
- Input your meeting details and turn on the toggle for Teams meeting
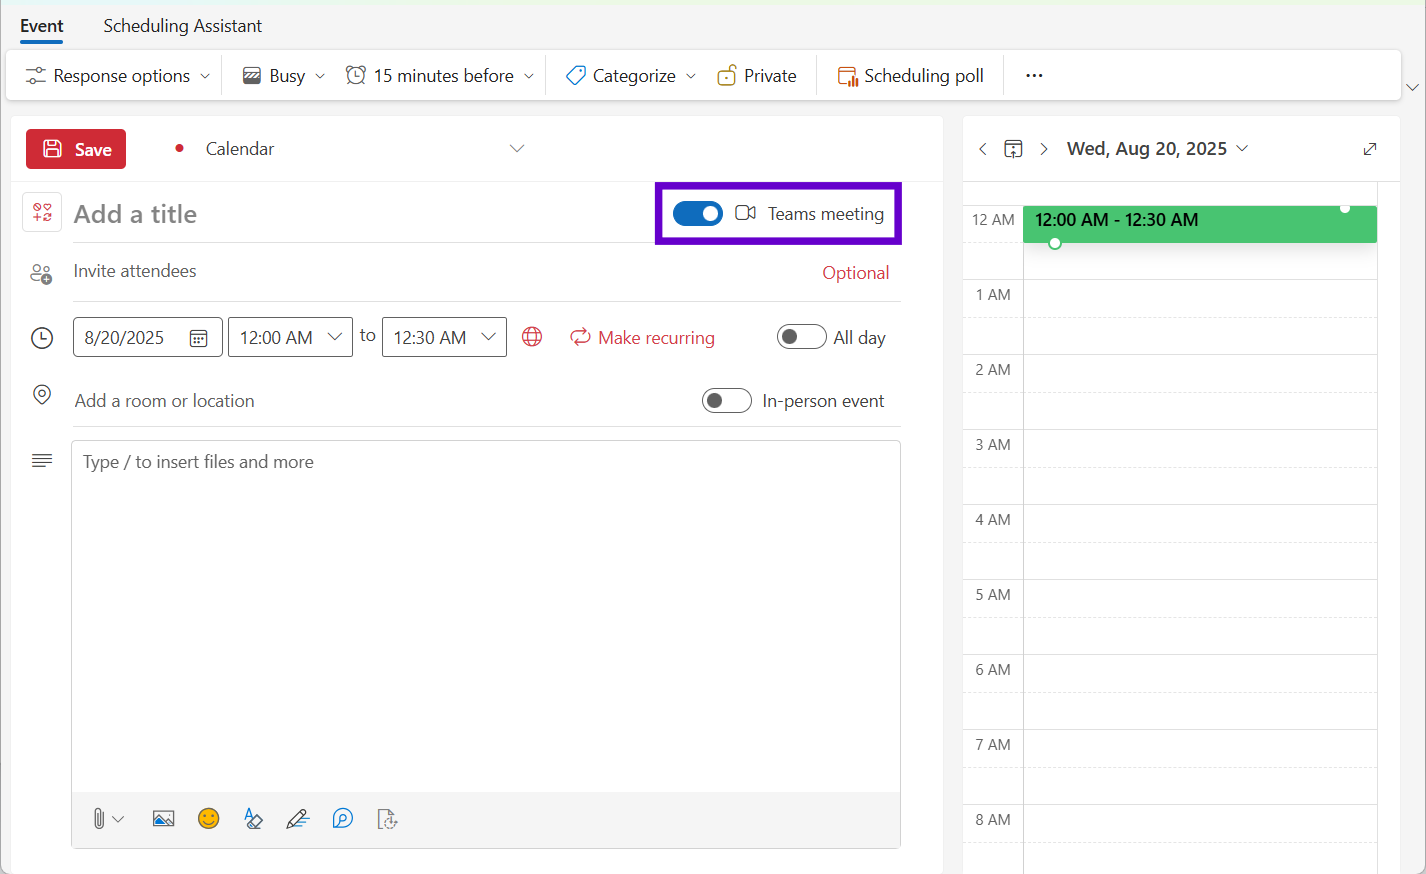
If you don't see Teams options, make sure you're actually using New Outlook (not the classic version) and that your Microsoft 365 account includes Teams.
To further enhance your New Outlook experience with AI-powered features, explore our guide on using AI in Outlook for smarter email composition and meeting management.
Setting Your Preferences
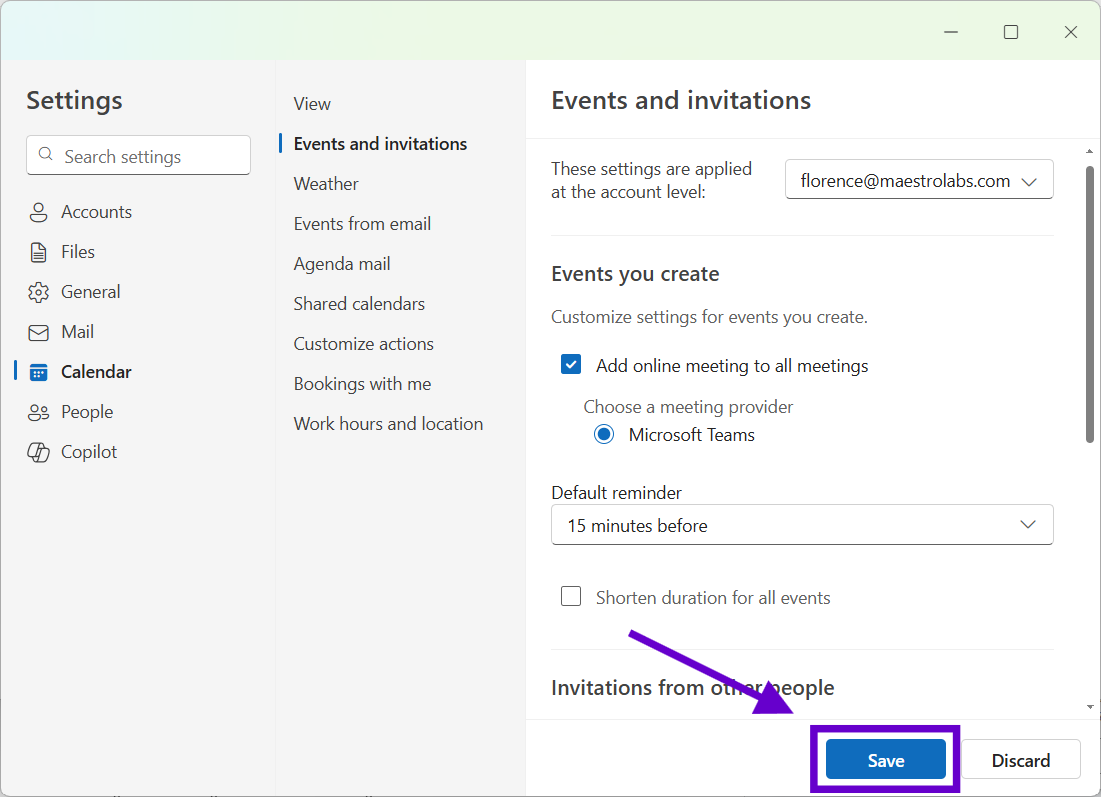
You can set up New Outlook to automatically add Teams to your meetings:
- Click the settings gear icon
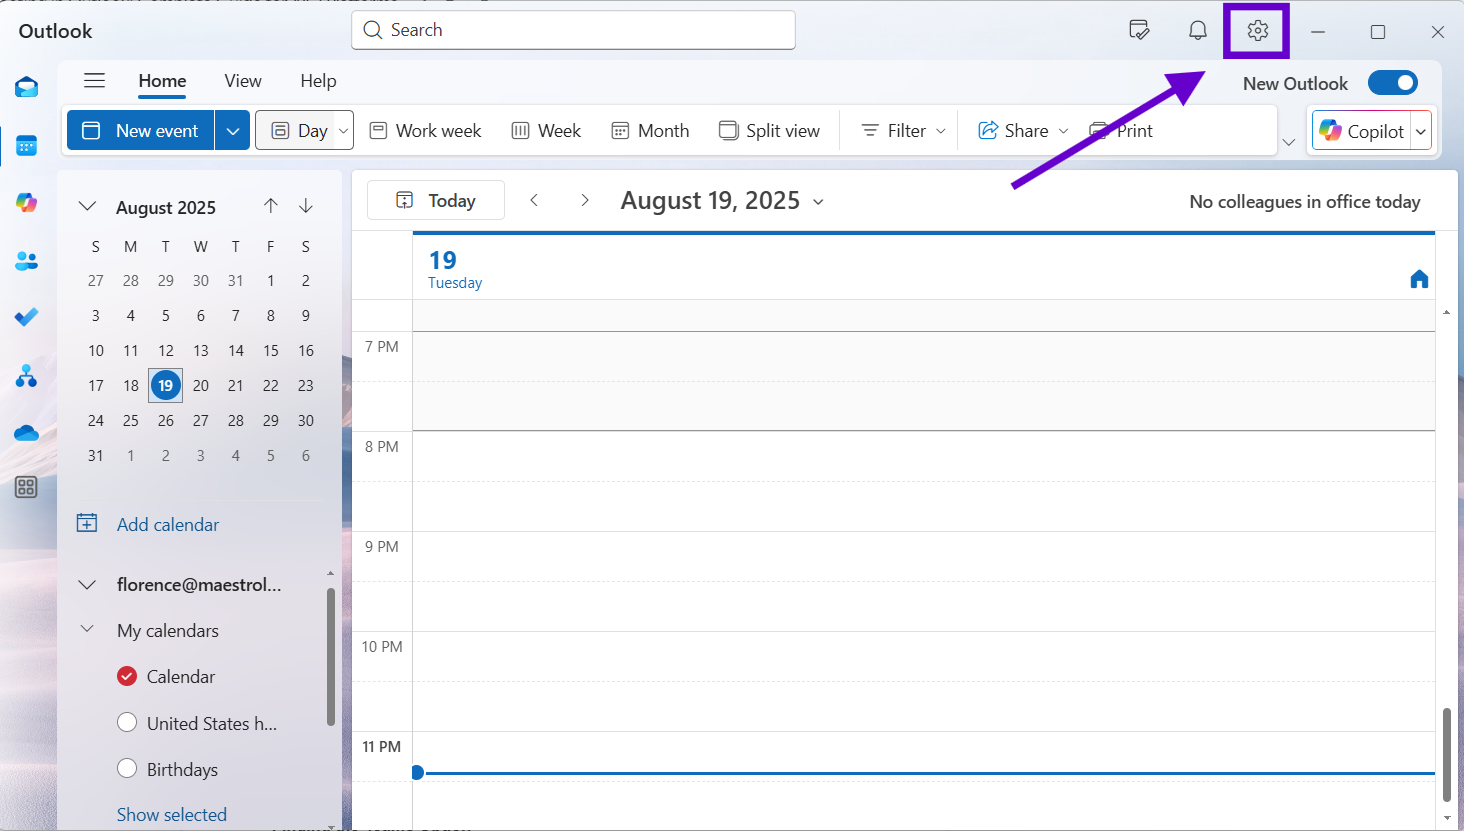
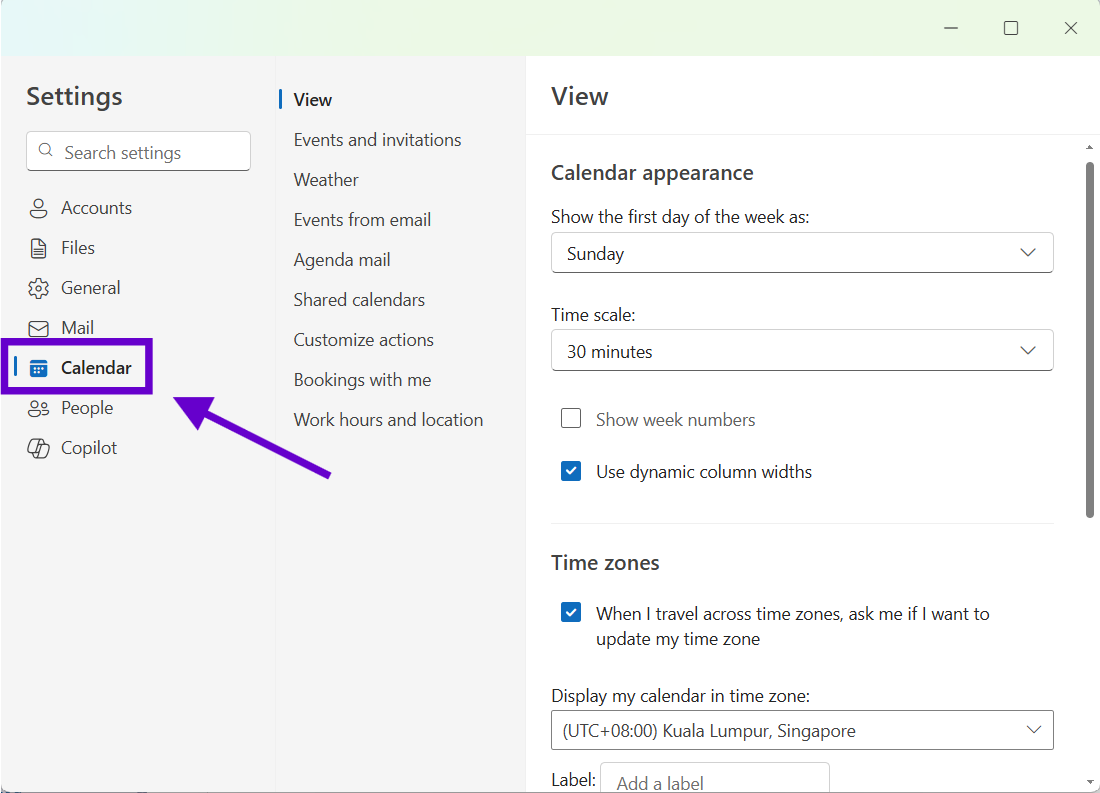
- Go to Calendar settings
- Under Events and invitations, enable “Add online meeting to all meetings” and confirm Microsoft Teams is chosen.
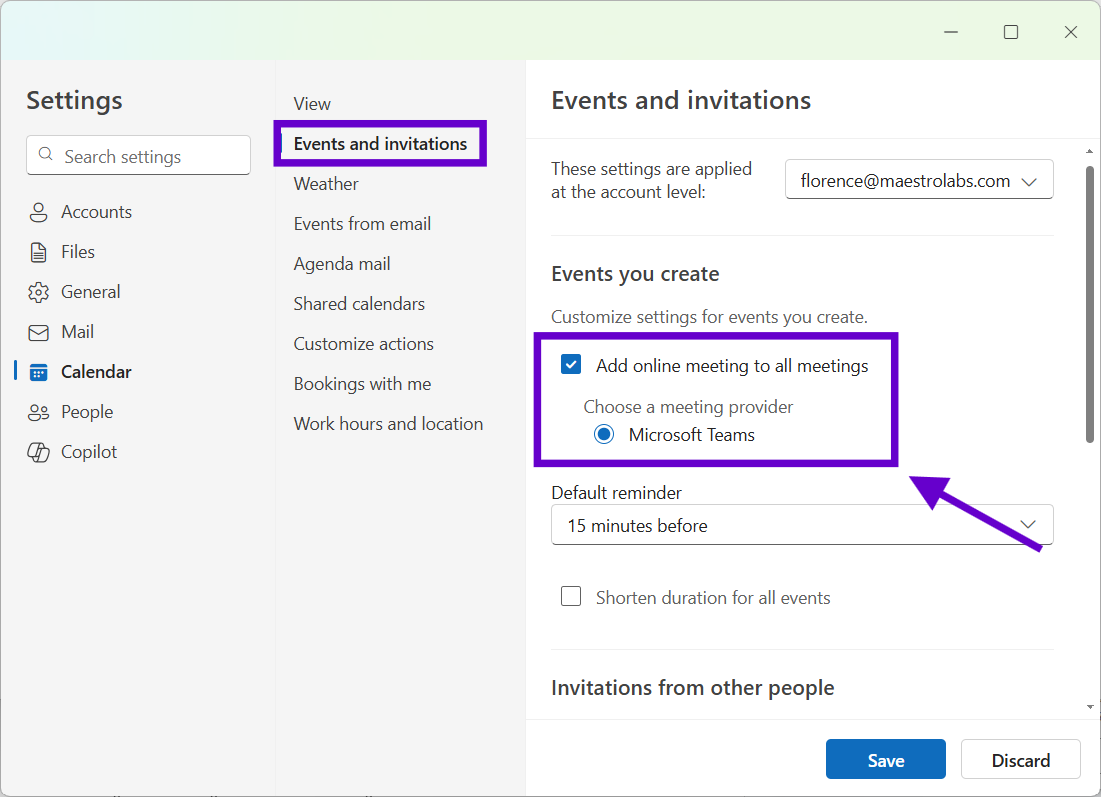
- Click Save if the button appears.
Scheduling Meetings
Creating Teams meetings in New Outlook is straightforward:
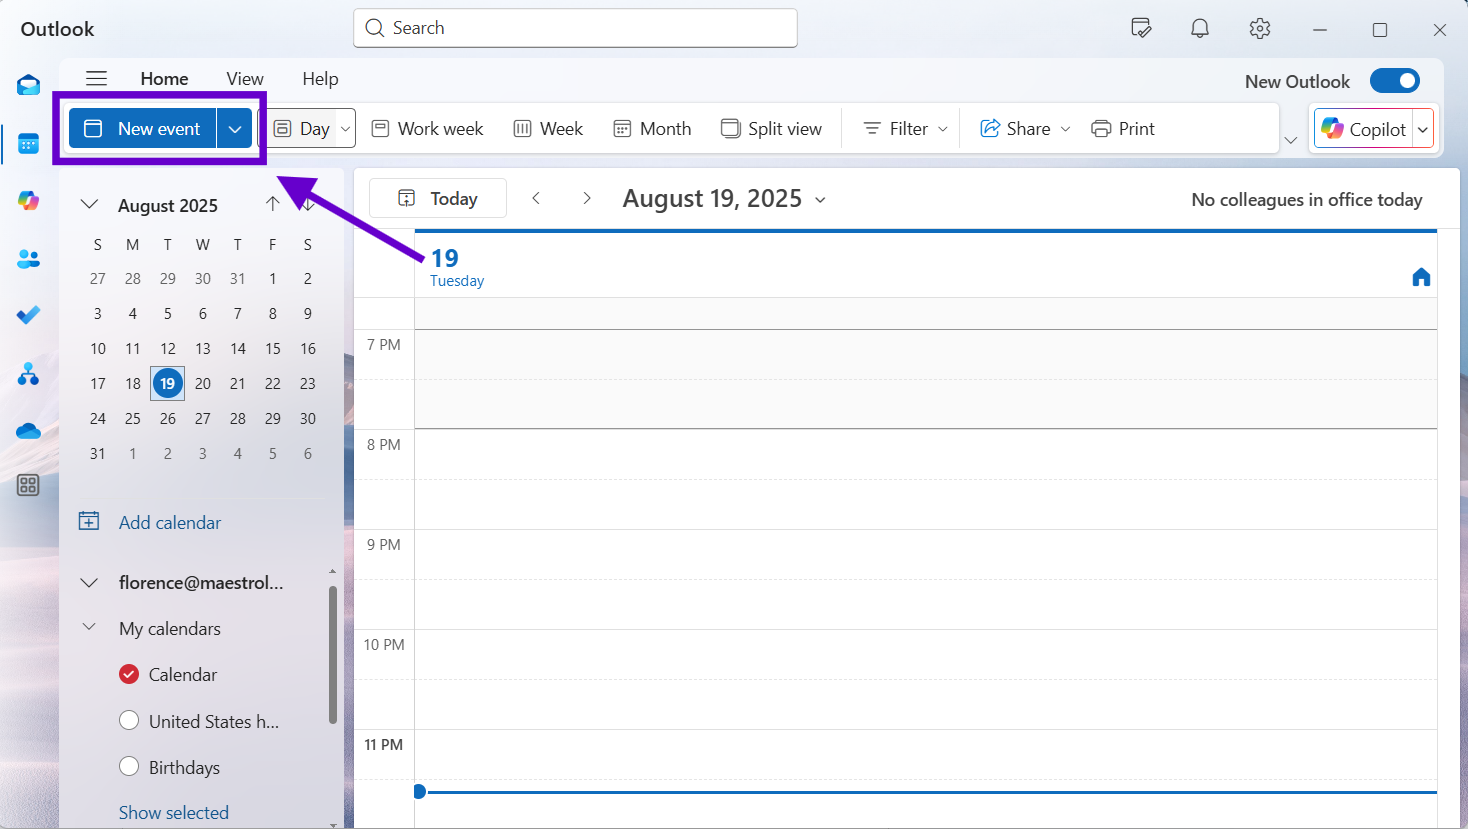
- Go to your calendar
- Click New Event
- Toggle on the Teams meeting option
- Fill in your meeting details
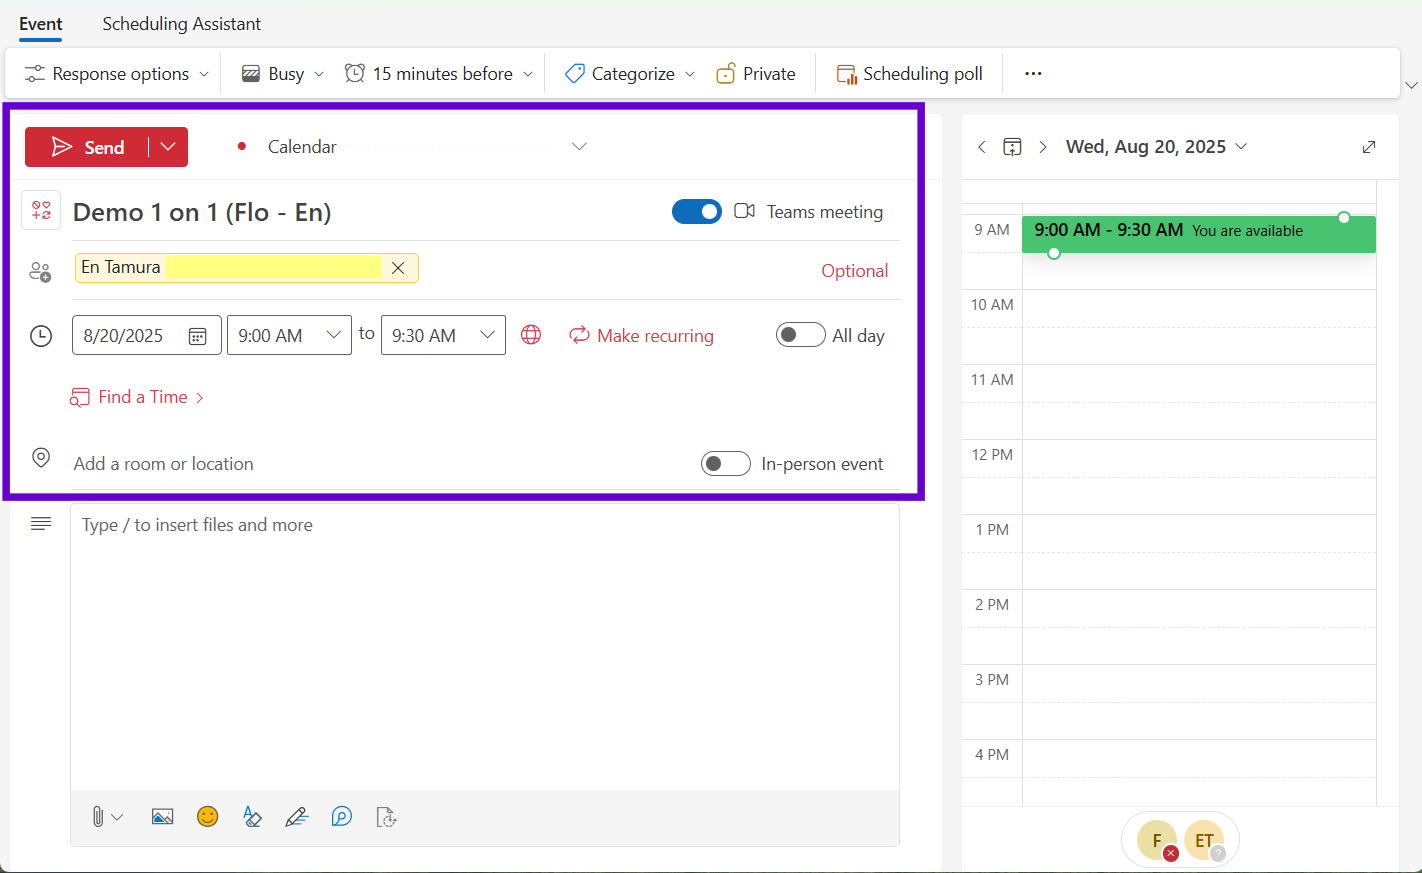
- Send the invitation
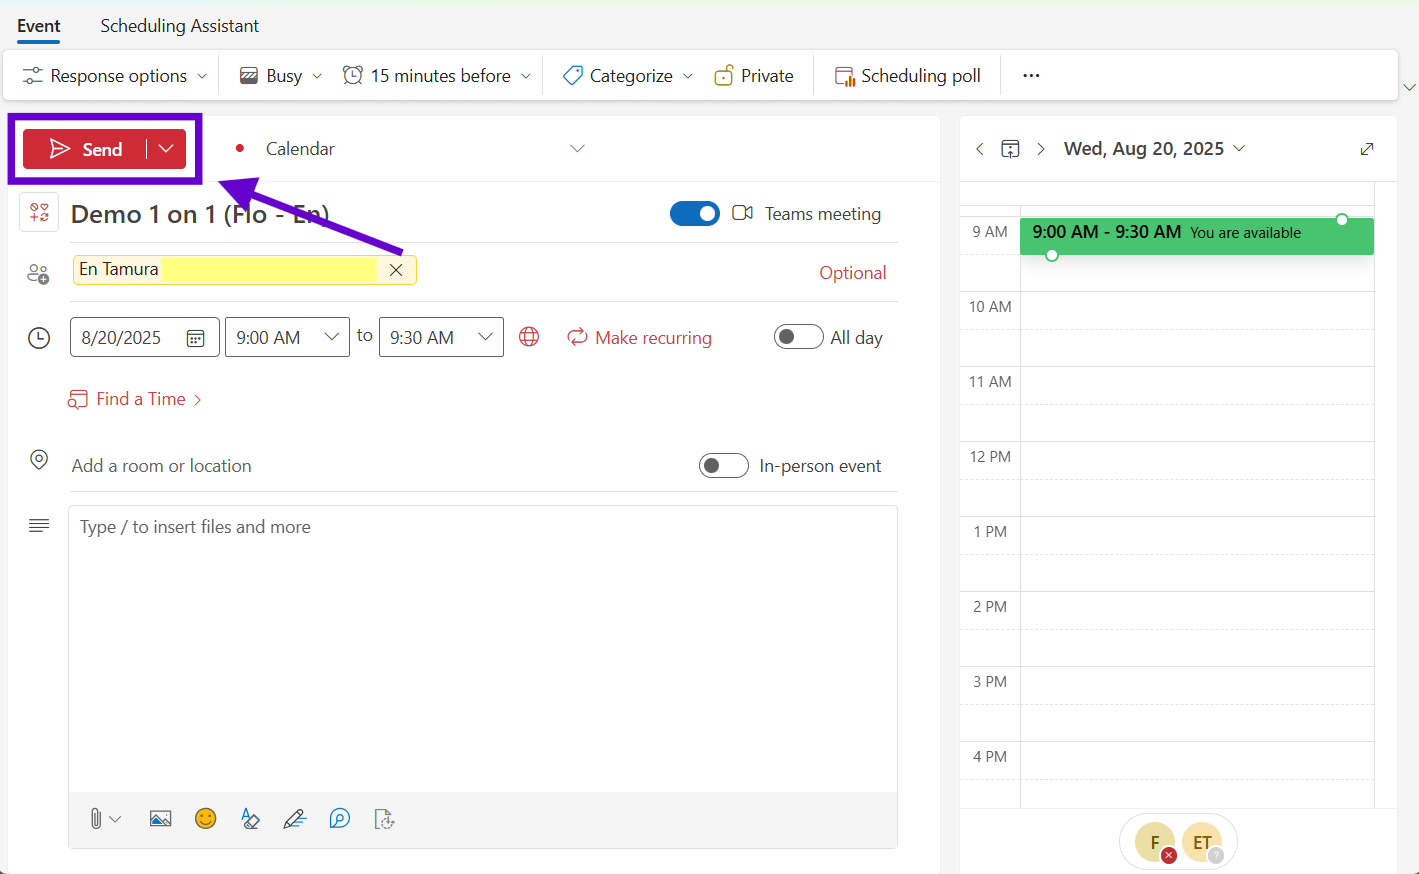
The Teams information gets added automatically, and it syncs better across your devices compared to the old add-in method.
Setting Up Teams in Outlook Web
If you use Outlook in your browser, you're in luck – Teams integration is usually available right out of the box.
Finding the Teams Option
- Sign into Outlook Web (outlook.live.com or your work portal)
- Go to Calendar
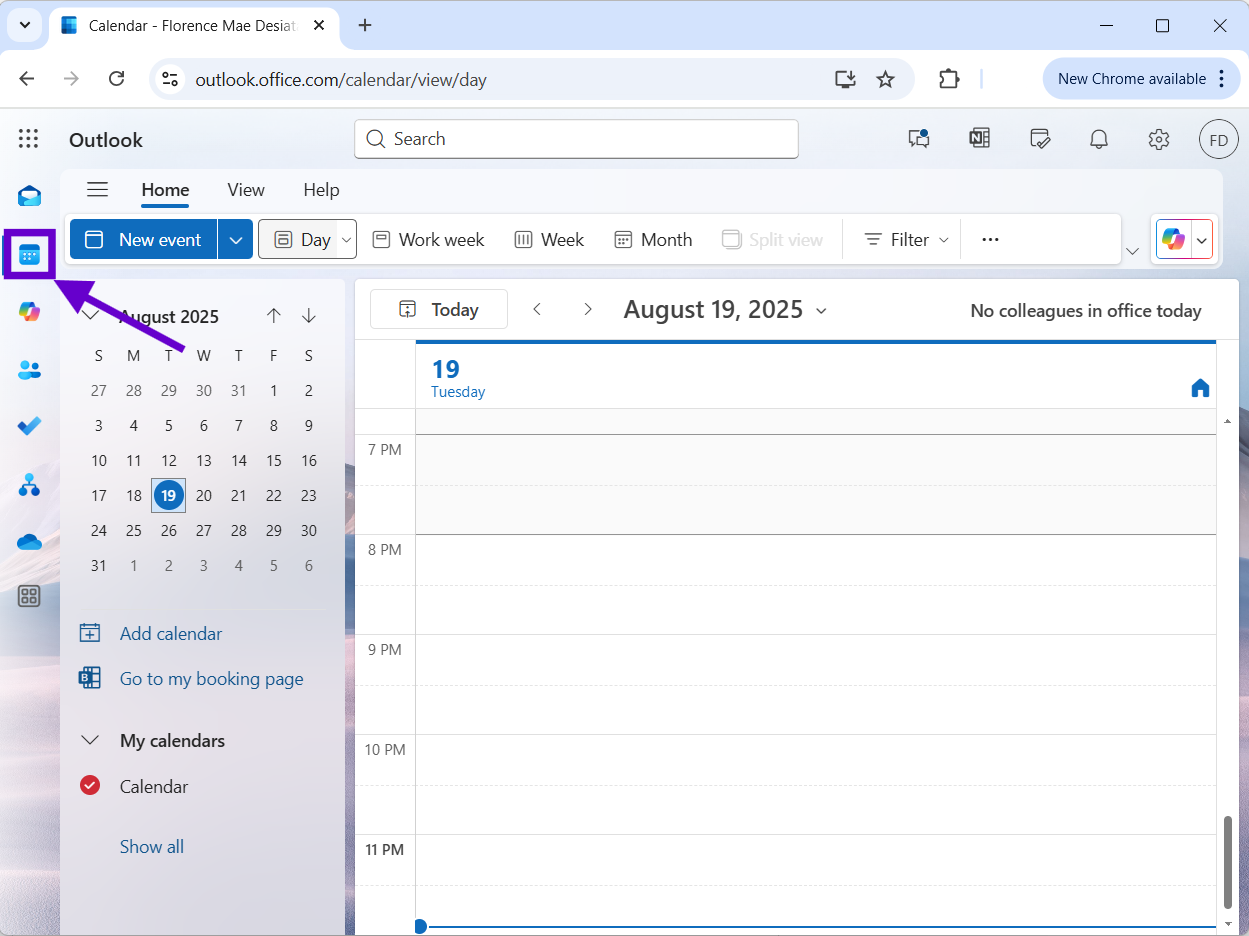
- Click New event
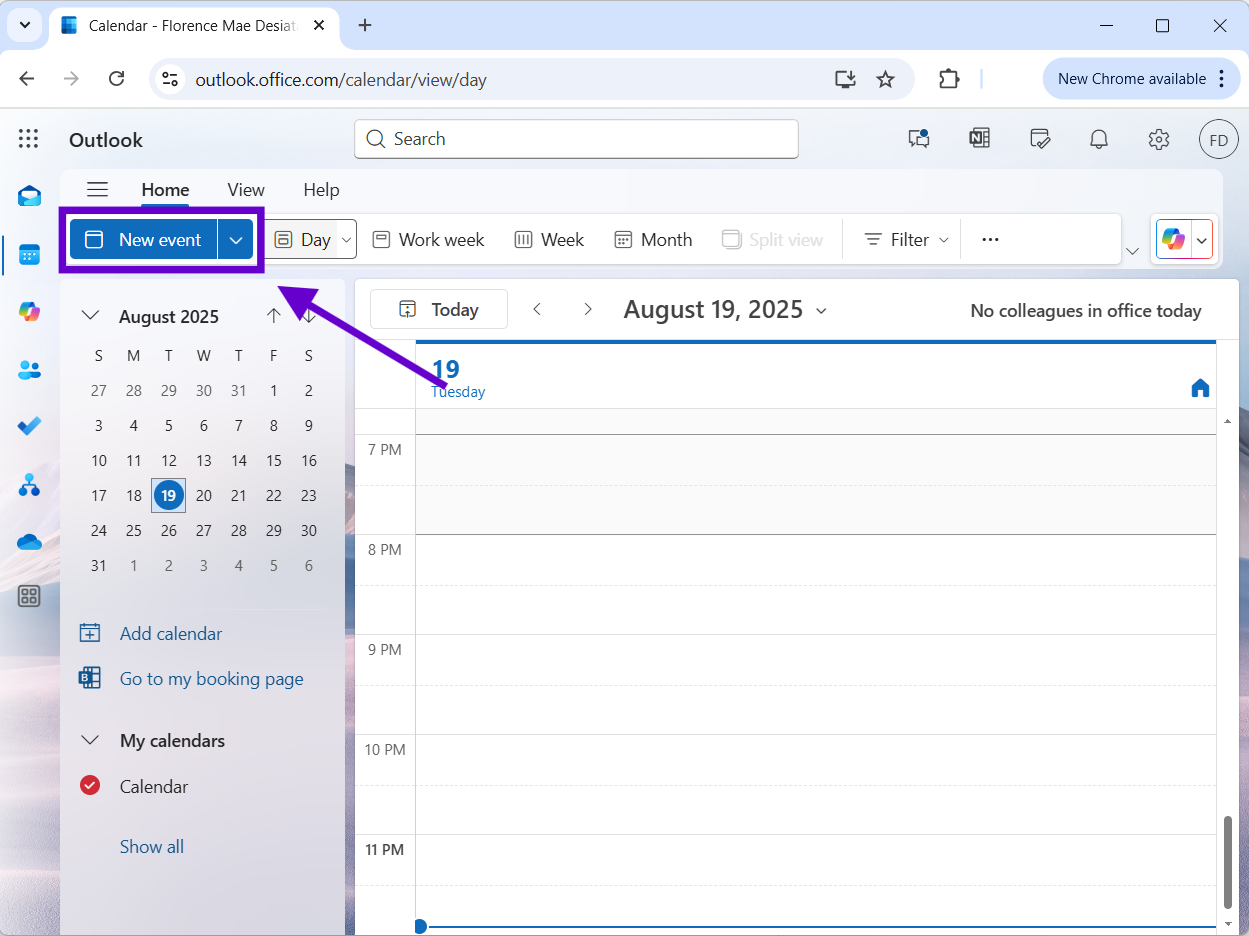
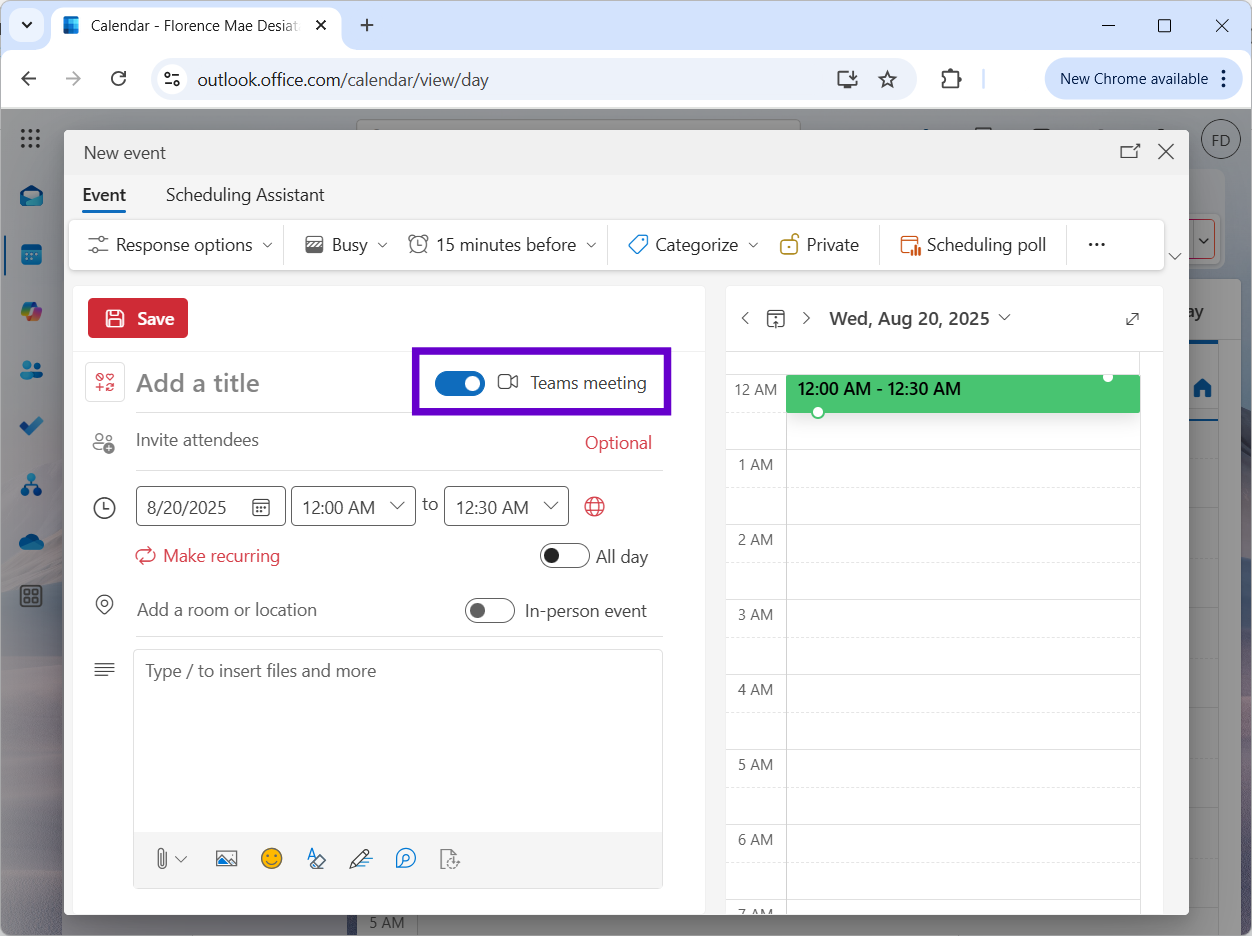
- Input your meeting details and turn on the toggle for Teams meeting
Creating Web-Based Teams Meetings
The process is similar to New Outlook:
- Go to your calendar
- Click New event
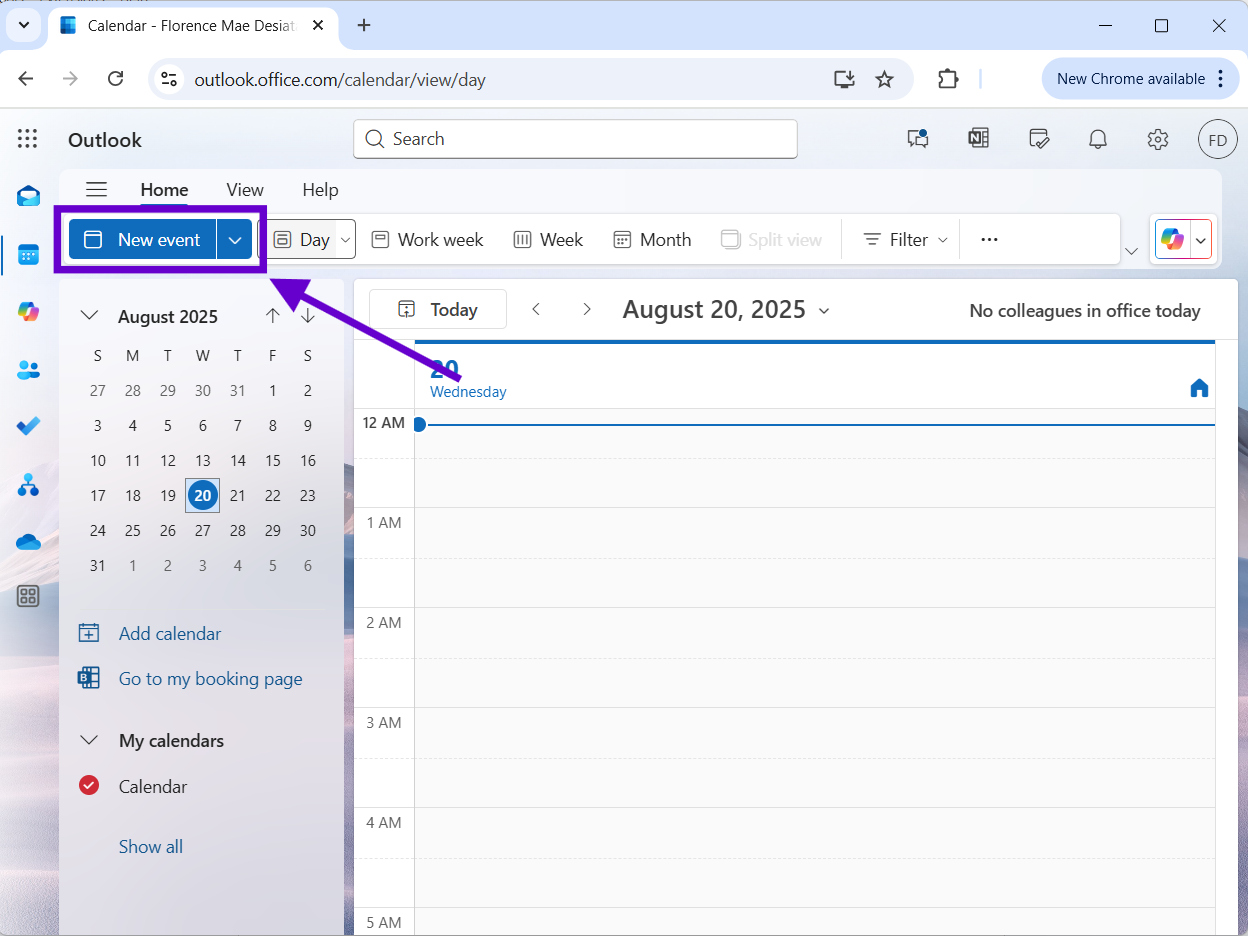
- Turn on the Teams meeting toggle
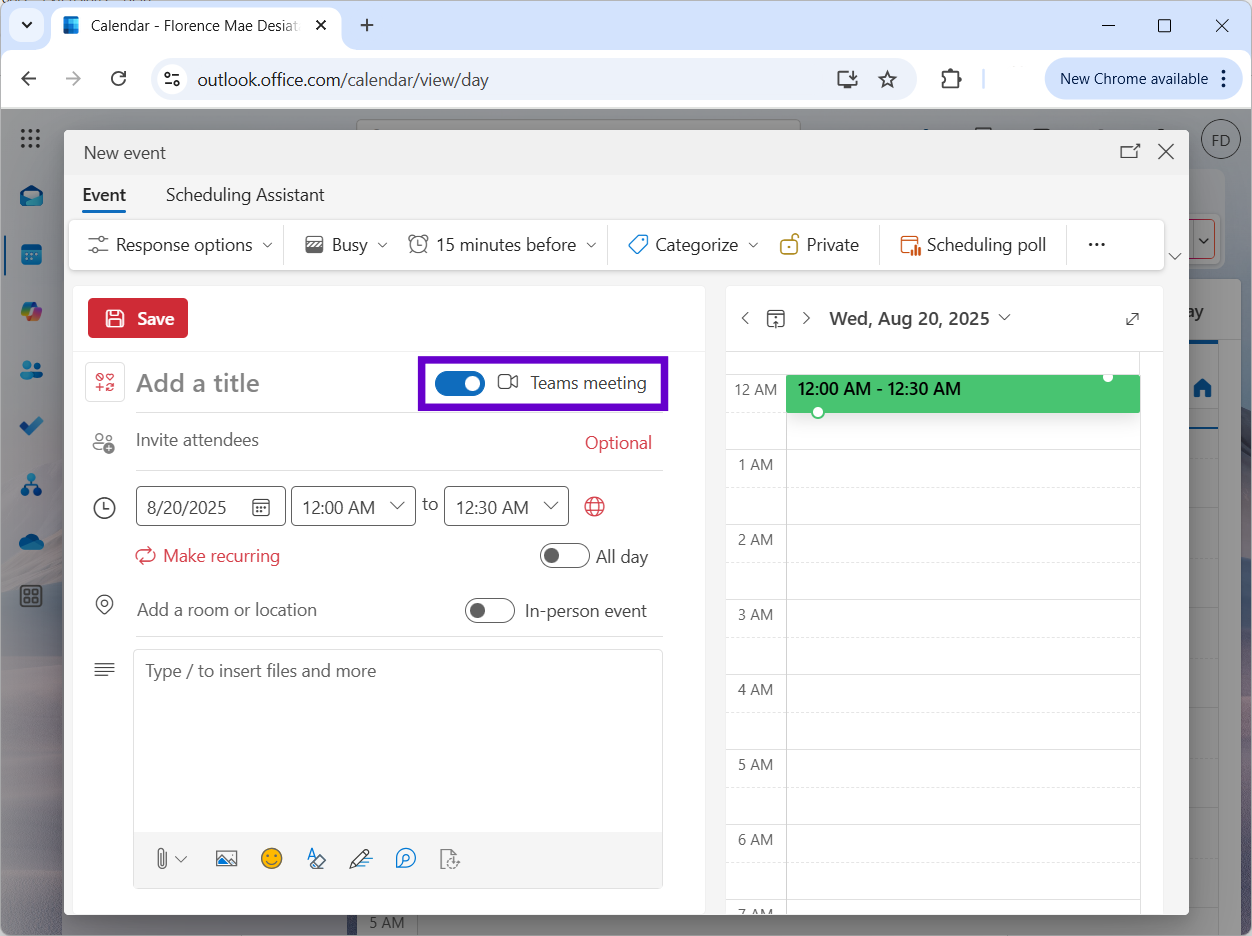
- Add your meeting details
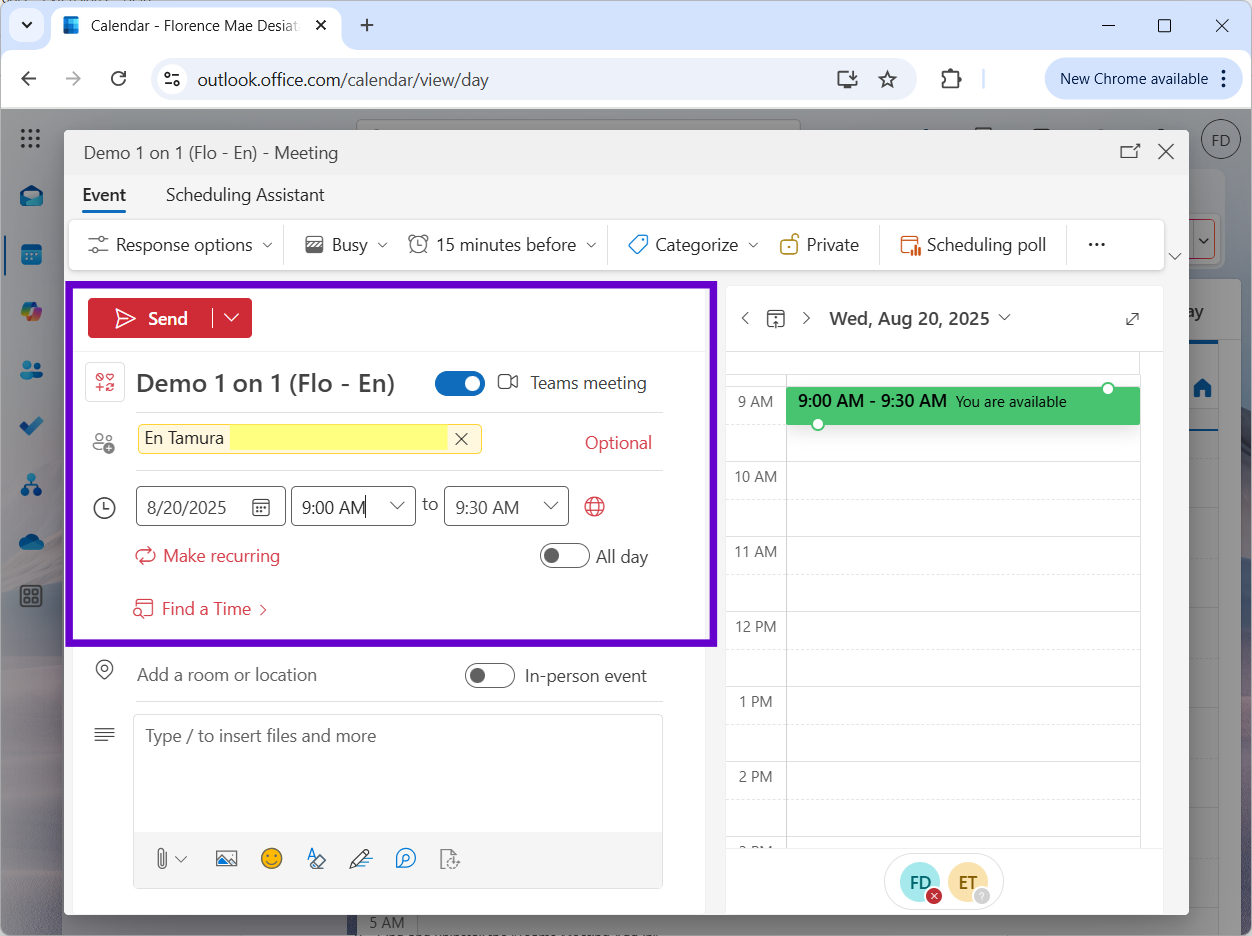
- Send the invitation
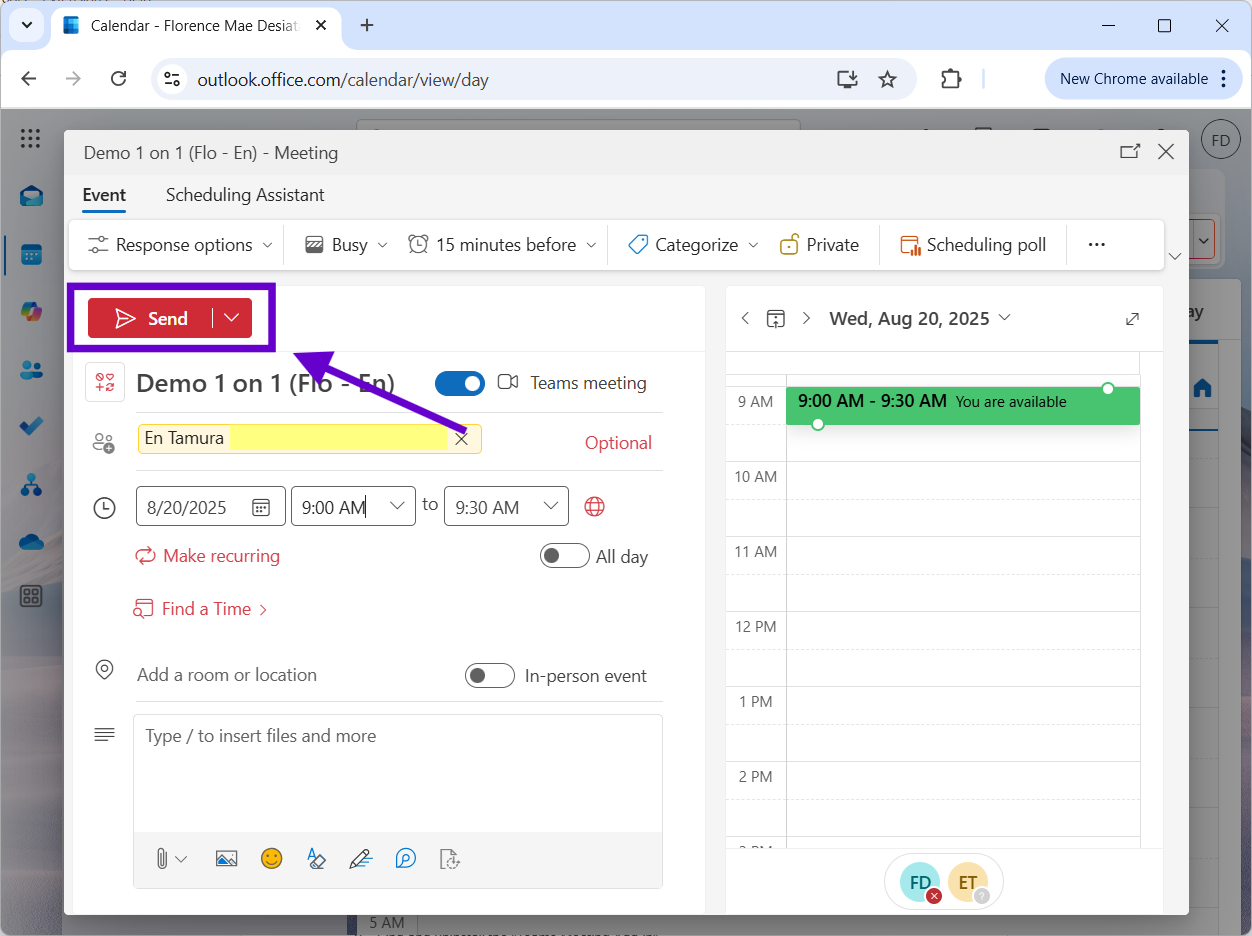
The web version is great because it works the same way whether you're on a Windows PC, Mac, or even a tablet.
For comprehensive strategies on managing your Outlook inbox effectively across all platforms, including organizing meeting invitations and follow-ups, check out our detailed productivity guide.
When Things Don't Work
Even when you follow all the steps correctly, sometimes Teams integration decides to take a vacation. Here are the most common problems and how to fix them.
The Teams Button Disappeared
This often happens after updating Teams. The meeting add-in sometimes doesn't reinstall properly. Here's what to do:
- Go to Windows Settings > Apps > Installed Apps
- Find and uninstall the "Teams Meeting Add-in"
- Close Outlook completely
- Close Teams from the system tray (right-click the Teams icon and select Quit)
- Restart Teams – this should reinstall the add-in
- Wait for the add-in to appear in your installed apps list again
- Restart Outlook
Microsoft Teams Add-in Won't Install
If you're in a corporate environment, your IT policies might be blocking the installation. Try these steps:
- Make sure you have administrator rights to install add-ins
- Check that your organization allows third-party add-ins
- Verify you're using Office 2016 or newer (older versions don't support Teams integration)
- Try installing through Microsoft AppSource instead of Outlook's built-in method
If none of that works, you might need to contact your IT department.
Meetings Don't Sync Across Devices
Sometimes a meeting you create on your computer doesn't show up properly on your phone or tablet. This usually fixes itself, but you can speed it up:
- Make sure you're signed into the same account on all devices
- Sign out and back in to refresh things
- Give it 5-10 minutes for everything to sync up
- Check your internet connection
Meeting Links Don't Work
If people are getting broken Teams links, it usually means the integration isn't set up quite right:
- Double-check that Teams integration is actually working
- Make sure your Teams license is active
- Verify the meeting location shows "Microsoft Teams Meeting"
- Test the links yourself before sending to important meetings
For additional troubleshooting and efficiency techniques, explore our comprehensive email productivity guide with proven strategies for optimizing your communication workflow.
Getting the Most Out of Your Setup
Once you have Teams integration working, there are a few things you can do to make your life even easier.
Streamline Your Workflow
- Set up automatic Teams addition for new meetings so you don't have to remember to click the button
- Use the same Microsoft account for both Outlook and Teams to avoid authentication headaches
- Test your setup regularly, especially after software updates
To further streamline repetitive meeting communications, consider setting up email templates in Outlook for common meeting types like project updates, client calls, or team standups.
Managing Multiple Accounts
If you work with different organizations or have multiple Microsoft accounts:
- Set up each Office installation separately for different organizations
- Make sure you have the right permissions for each account
- Use consistent account pairing for each Outlook/Teams combination
- Test cross-organization meetings to make sure they work
For professionals juggling multiple communication channels and seeking to optimize their overall email workflow, explore our guide on top email organization tools that can complement your Teams meeting setup.
Enhance Your Meeting Communications with AI
While setting up Teams integration handles the technical side, improving the quality of your meeting invitations and follow-up communications can significantly boost productivity.
MailMaestro's AI-powered assistance can help you:
- Draft clear, professional meeting invitations
- Create comprehensive meeting agendas from simple prompts
- Generate follow-up emails with action items
- Maintain consistent communication across all your Teams meetings
For professionals interested in comparing AI-powered communication tools, check out our detailed analysis of MailMaestro vs other email assistants to find the best solution for your meeting workflow.
Wrapping Up
Setting up Teams meetings in Outlook really does make scheduling video calls much simpler. Once you know which version of Outlook you're using and follow the right steps, the whole process becomes pretty automatic.
The main thing to remember is that Classic Outlook users need to manage add-ins, while New Outlook and Web users get native functionality with almost no setup required.


follow-up on our previous call, ask if he’s ready to start cooperation let him know that our discount ends tomorrow ask him if he had time to calculate roi


