Microsoft Teams Tips & Hidden Features: 9 Productivity Hacks for 2025
Microsoft Teams serves over 300 million monthly users, yet most professionals utilize less than 20% of the platform's capabilities. The gap between basic users and power users comes down to knowing which hidden features solve real workplace problems and where to find them in Teams' interface.
We've identified 15 advanced techniques that busy professionals can implement immediately. These go beyond standard tutorials, focusing on automation, productivity multipliers, and professional workflows that address time-wasting pain points in daily work routines.
Advanced Microsoft Teams Recording Tips for Meeting Documentation
Meeting documentation represents one of the most critical yet challenging aspects of modern workplace collaboration. While Teams offers recording capabilities, the majority of users struggle with access restrictions, missing features, and poor recording quality that renders meetings less useful than handwritten notes.
1. How to Record Teams Meetings as an External Guest or Any User
Recording restrictions frustrate external guests and even internal users who lack specific permissions. Microsoft designed these limitations for security reasons, but they often prevent legitimate documentation needs. Most users are unaware that recording permissions can be modified during meetings or that alternative recording methods are available.
Step-by-Step Instructions:
- Join your Teams meeting and wait for at least one other participant
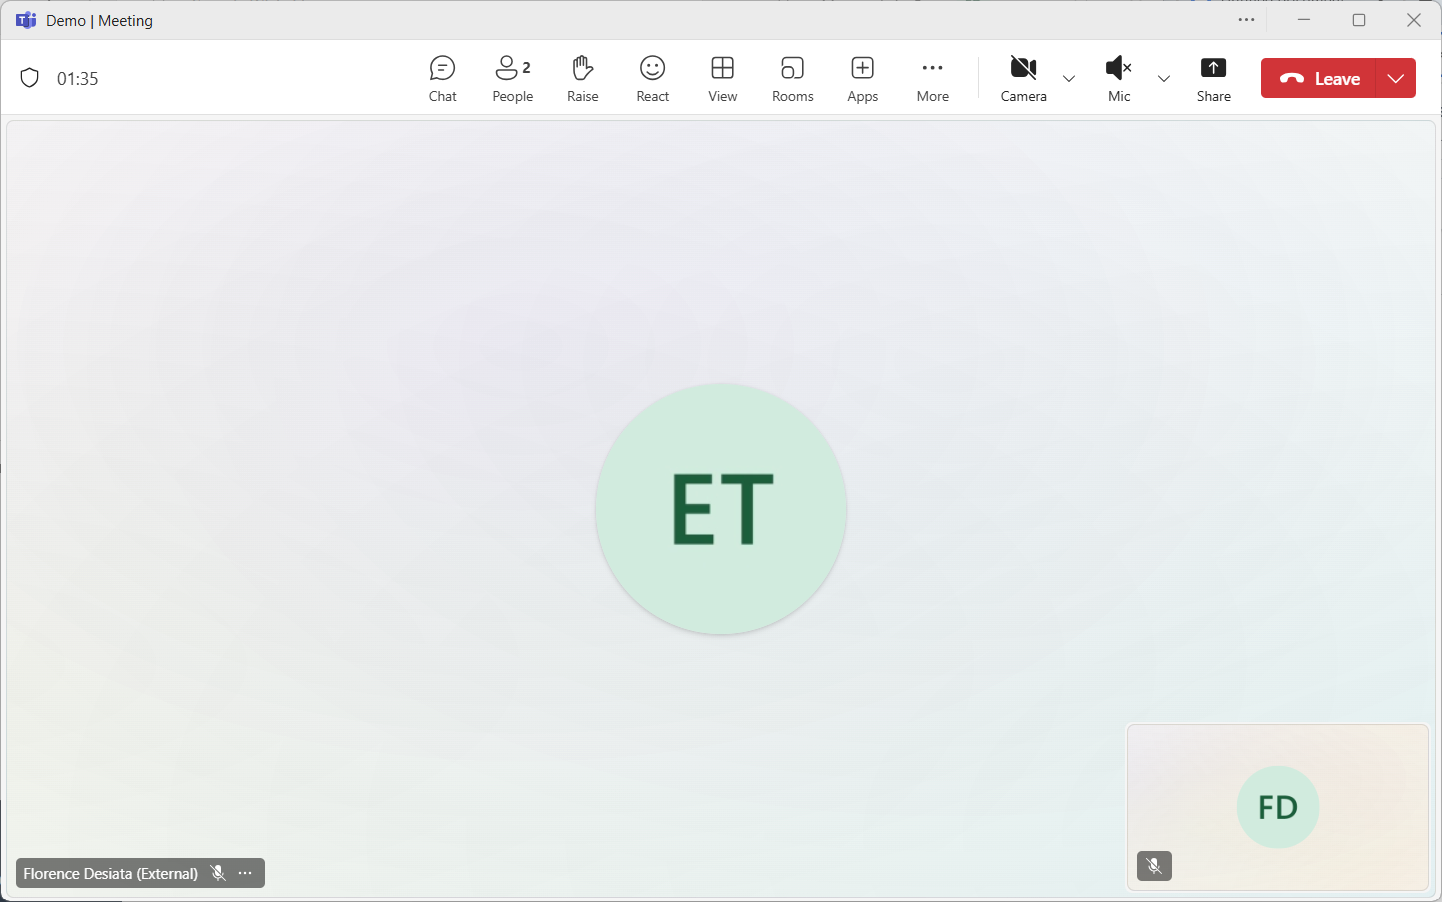
- Click the three dots (⋯) in your meeting controls toolbar
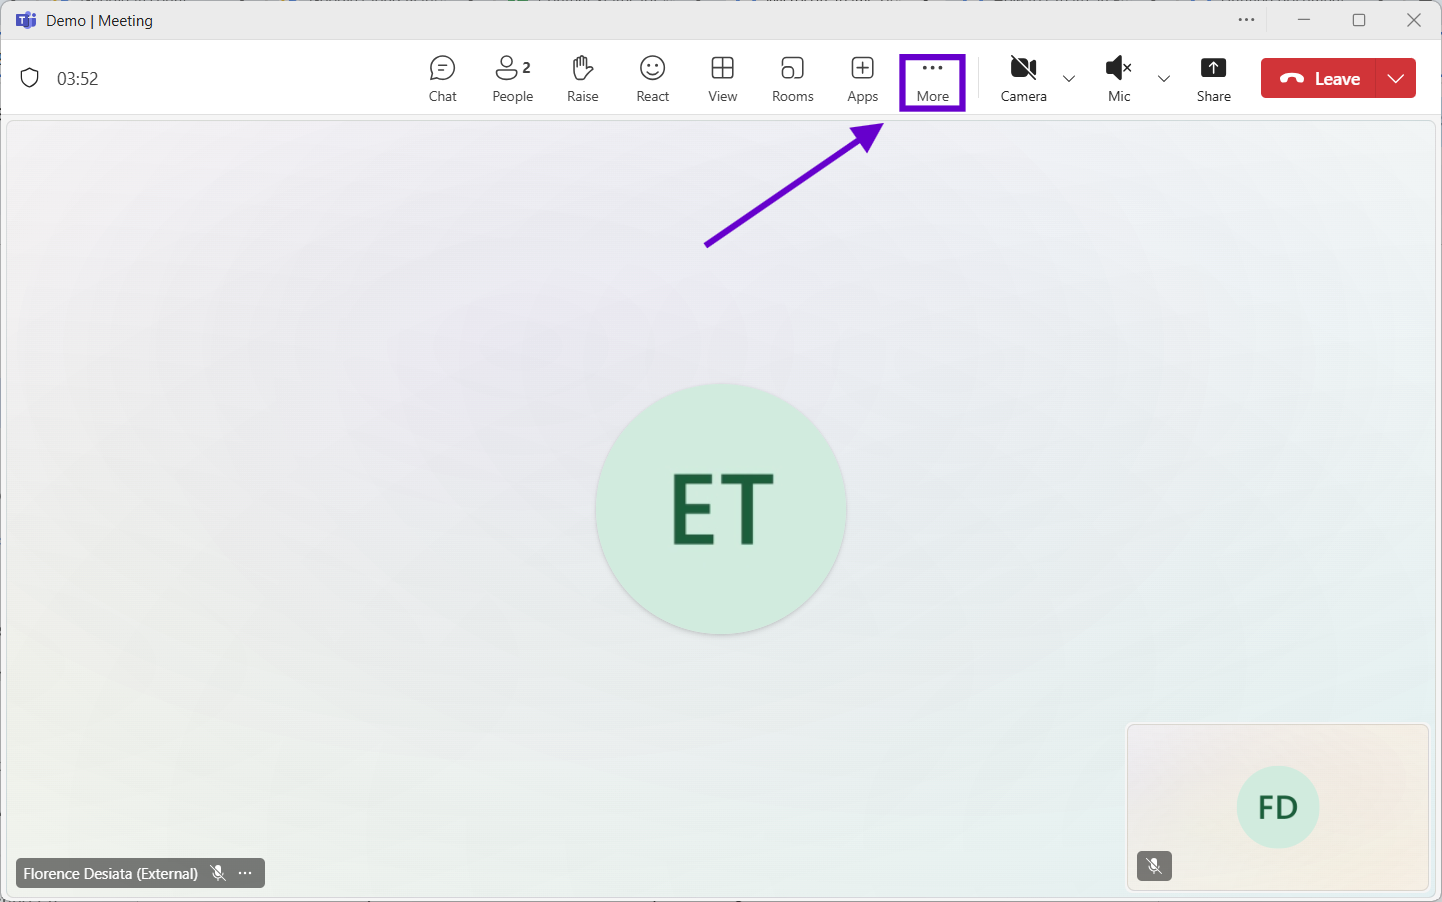
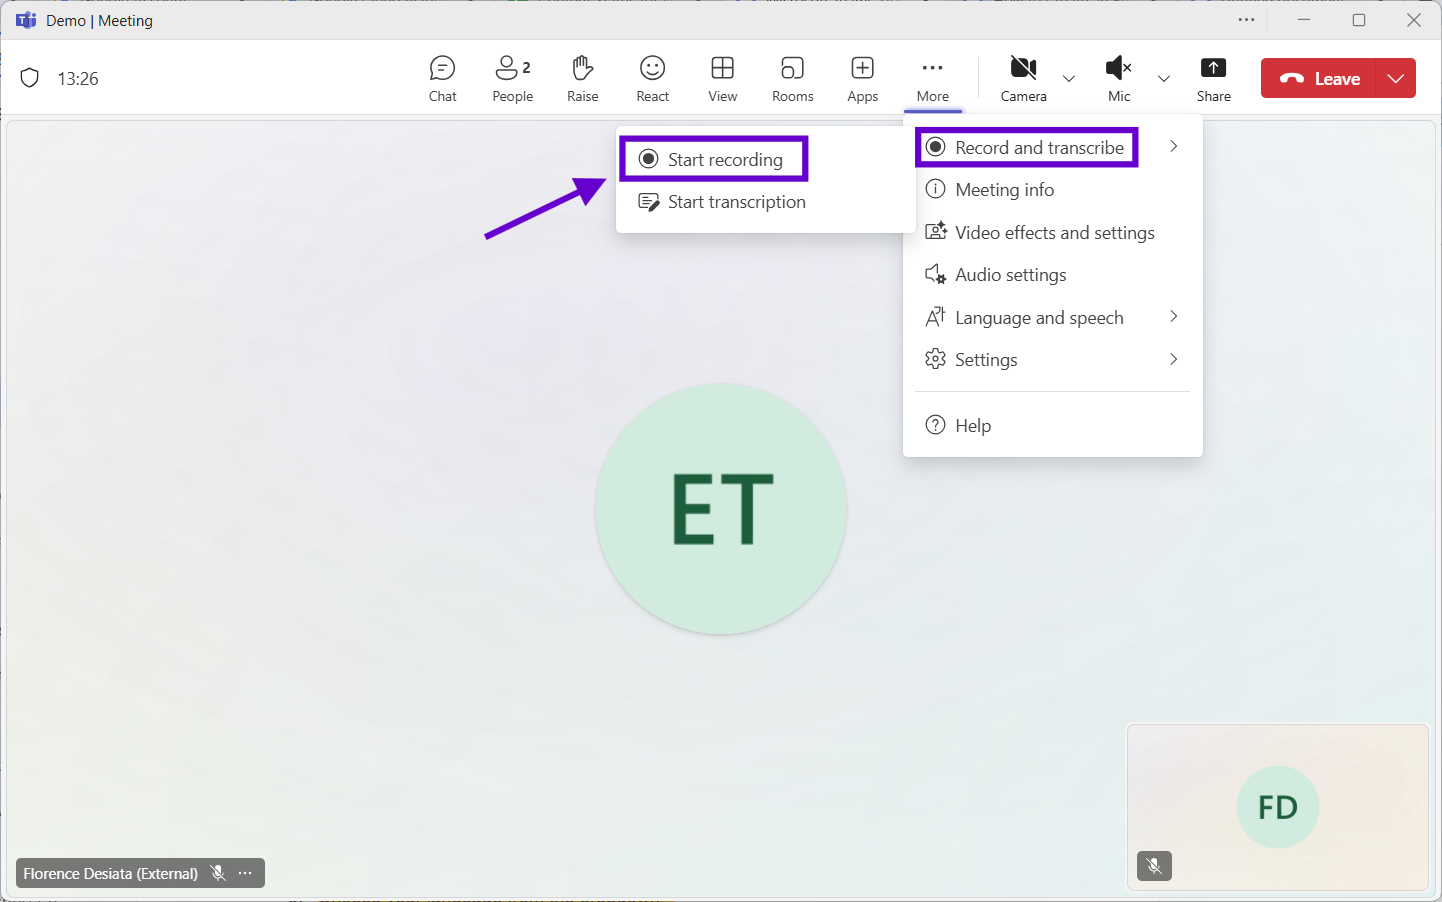
- Select "Record and transcribe" from the dropdown menu
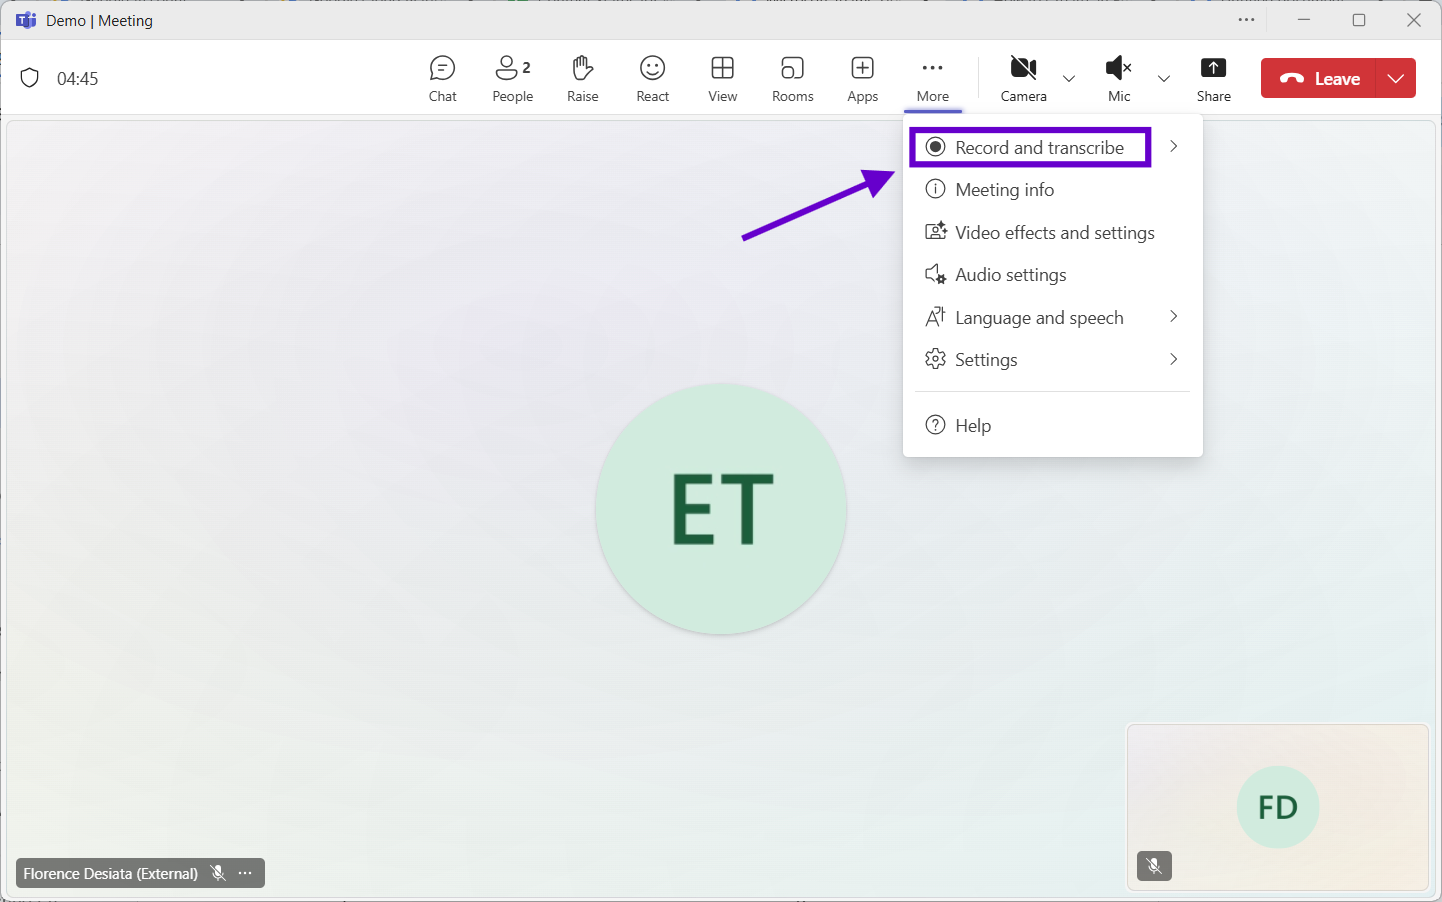
- Click "Start recording"
- Select a language from the prompt and click “Confirm”
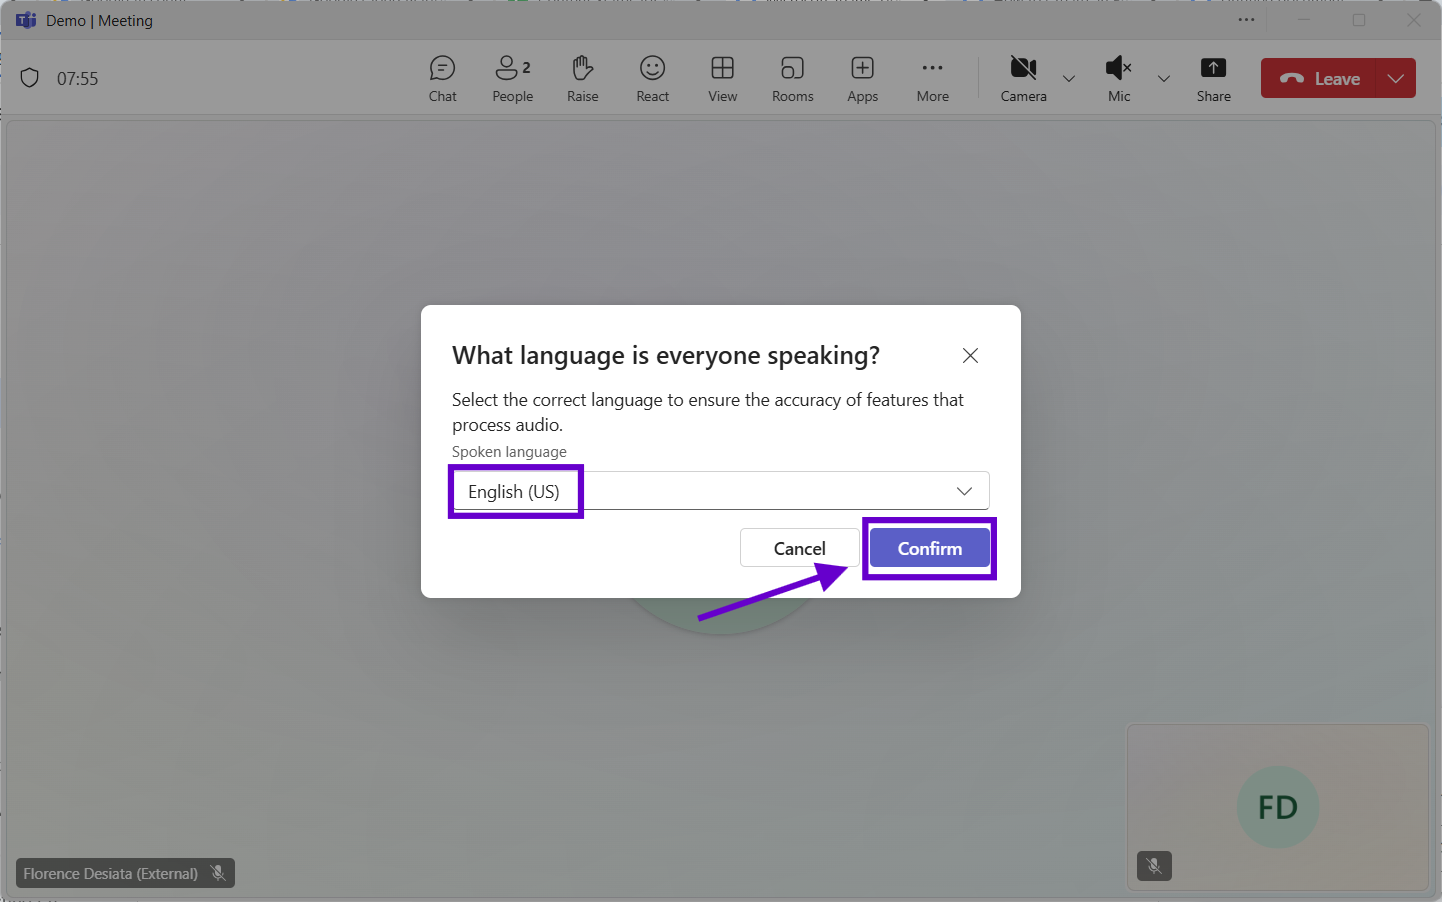
- To pause: Use the three dots menu and select "Pause recording"
- To stop: Click three dots and choose "Stop recording"
- Access your recording in meeting chat or the organizer's OneDrive within 20 minutes
Meeting organizers and co-organizers always have recording rights. Same-organization participants can record if IT policies allow. External guests typically cannot record unless granted presenter status.
Pro Tip: External guests should request presenter status from the meeting organizer before important discussions begin. This simple role change often resolves recording restrictions for client calls or cross-company collaborations.
2. Enable Teams Meeting Transcription for Searchable Content
Transcription transforms spoken conversations into searchable text archives, yet most professionals overlook this feature entirely. The MS Teams transcription option hides within meeting controls, and many users assume it requires expensive Teams Premium licenses. In reality, basic transcription works with standard Teams licenses.
Step-by-Step Setup:
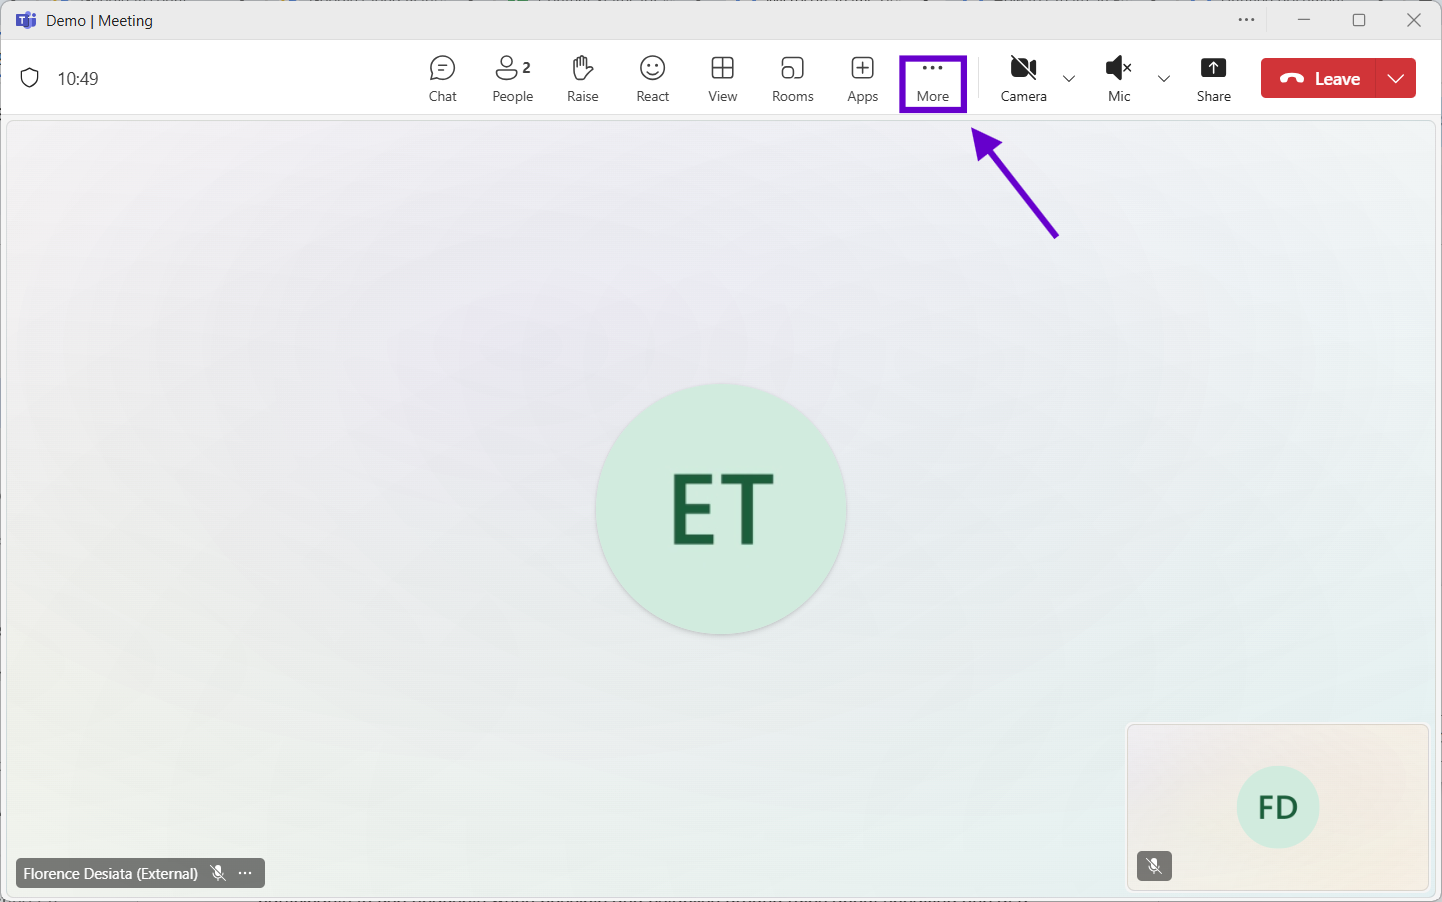
- During any meeting, click the three dots (⋯) in meeting controls
- Select “Record and Transcibe” and click "Start transcription" from the dropdown menu
- Choose your language from the dropdown
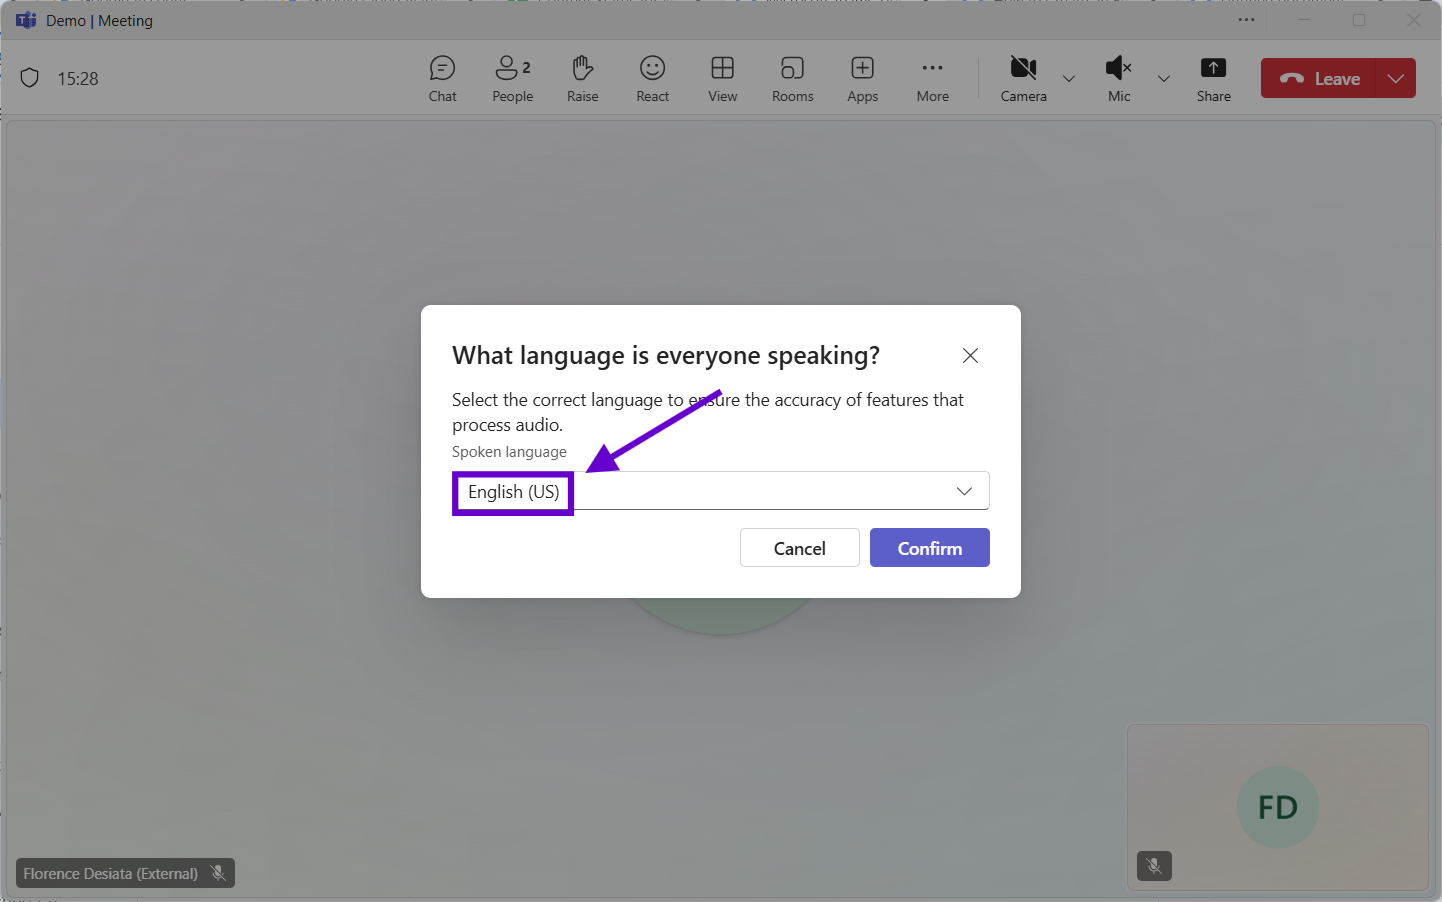
- Click "Confirm" to begin real-time transcription
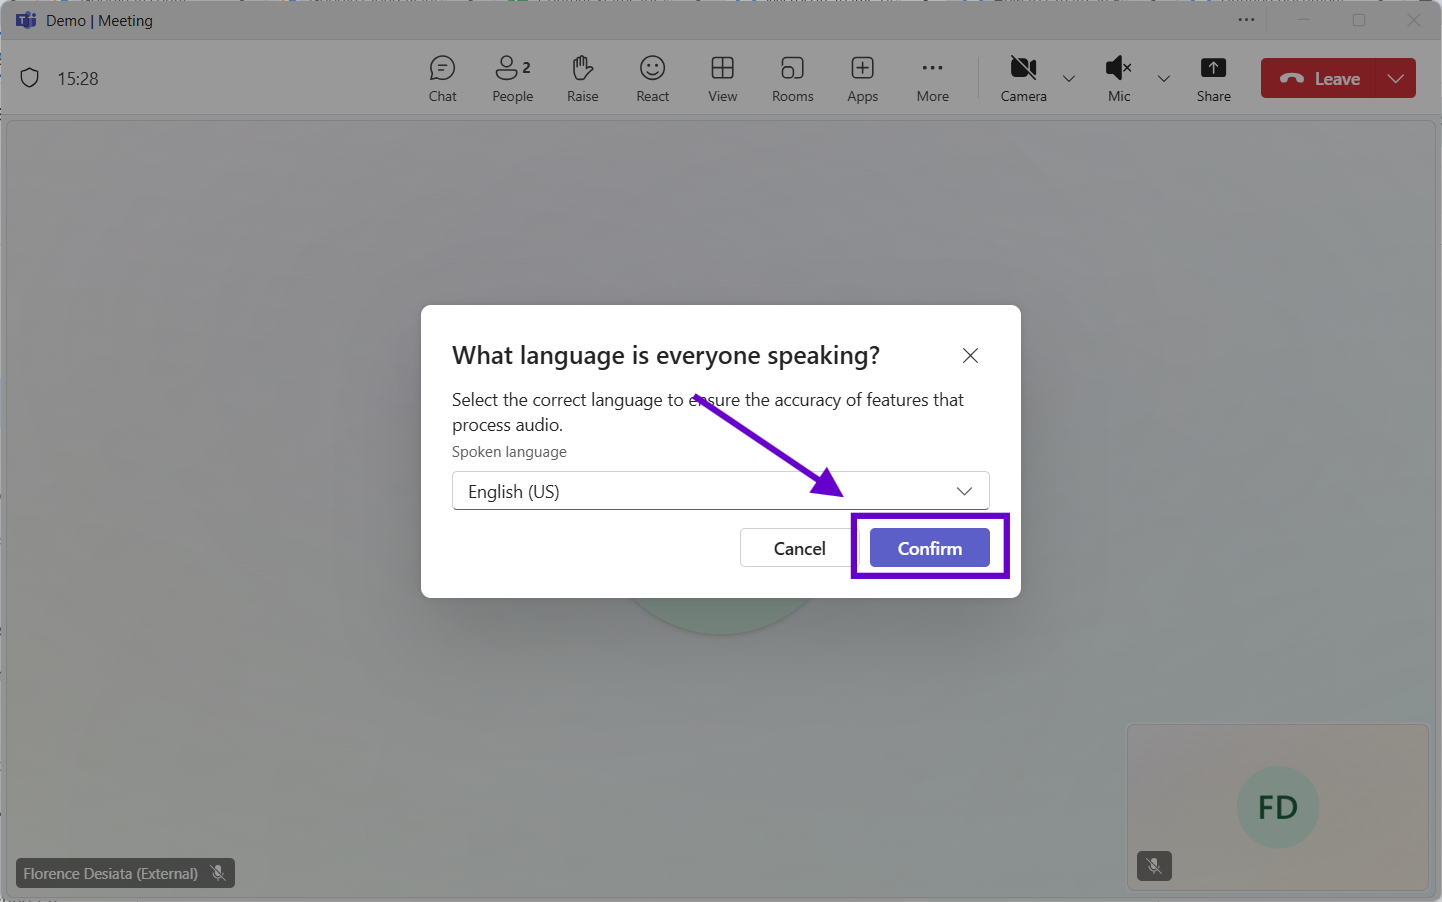
- View live transcript by clicking the "Transcript" button in meeting controls
- Stop transcription using three dots → "Stop transcription"
- Access completed transcripts in meeting chat under the "Recap" tab
Teams automatically identifies different speakers and attributes comments to participants. All transcription content becomes searchable across your Teams environment. Users can export transcript text or download formatted documents for external sharing.
Reminder: Clear audio input significantly improves transcription accuracy. Encourage participants to use headsets when possible and establish ground rules about speaking one at a time during important discussions.
3. TeamsMaestro AI Note Taker Automated Summaries
Taking notes during meetings often means sacrificing real-time participation. Microsoft Teams offers built-in recording and transcription capabilities, but accessing those files can be confusing. Transcripts are stored in various locations, depending on how the meeting was scheduled, and only specific users may have permission to view them.
TeamsMaestro makes it simple. You get AI-generated summaries, transcripts, and action items for every meeting, all in one place. Everything is stored in your TeamsMaestro dashboard, right inside the Microsoft Teams app. There is no need to dig through OneDrive or SharePoint to find what you need.
Step-by-Step Setup:
- Go to the MS Teams App Store and search "TeamsMaestro"
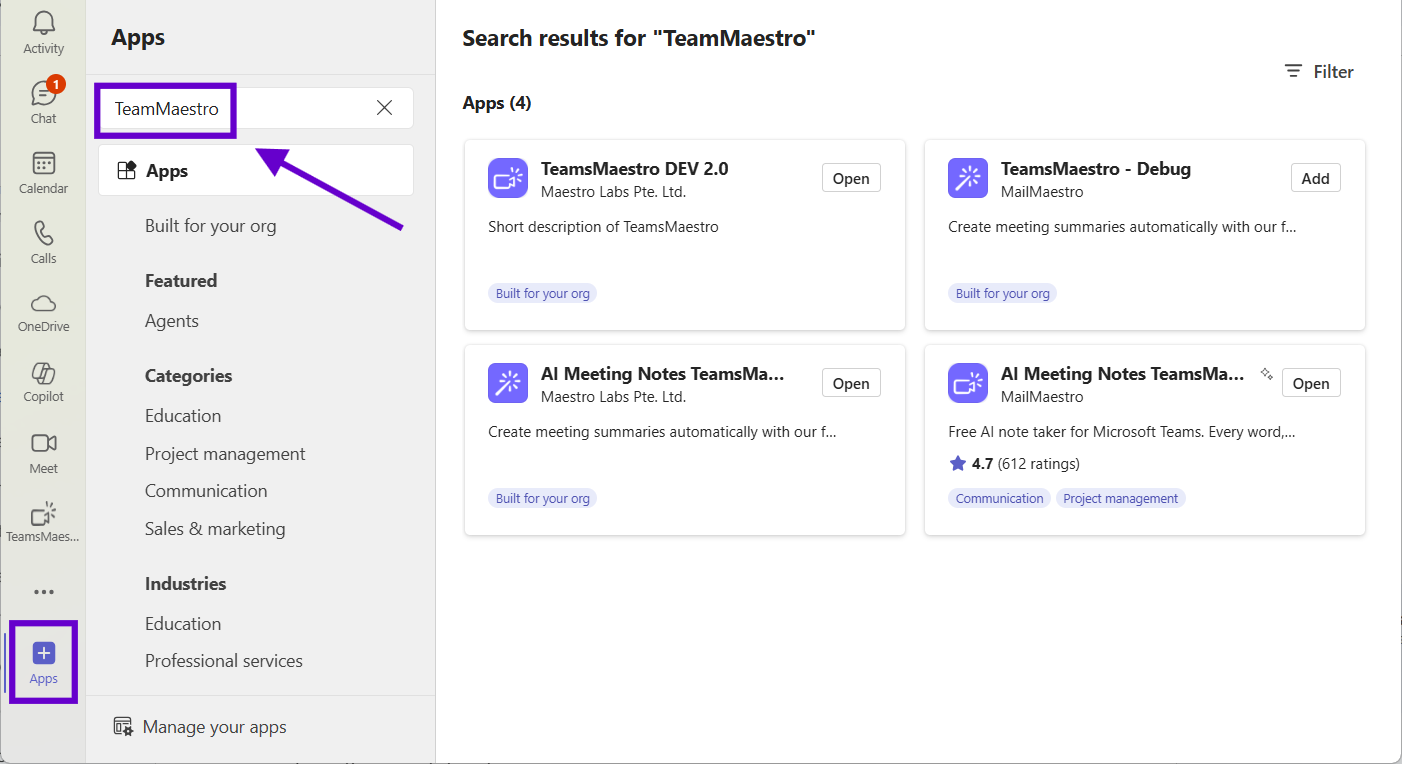
- Click "Add" and choose personal or team-wide installation
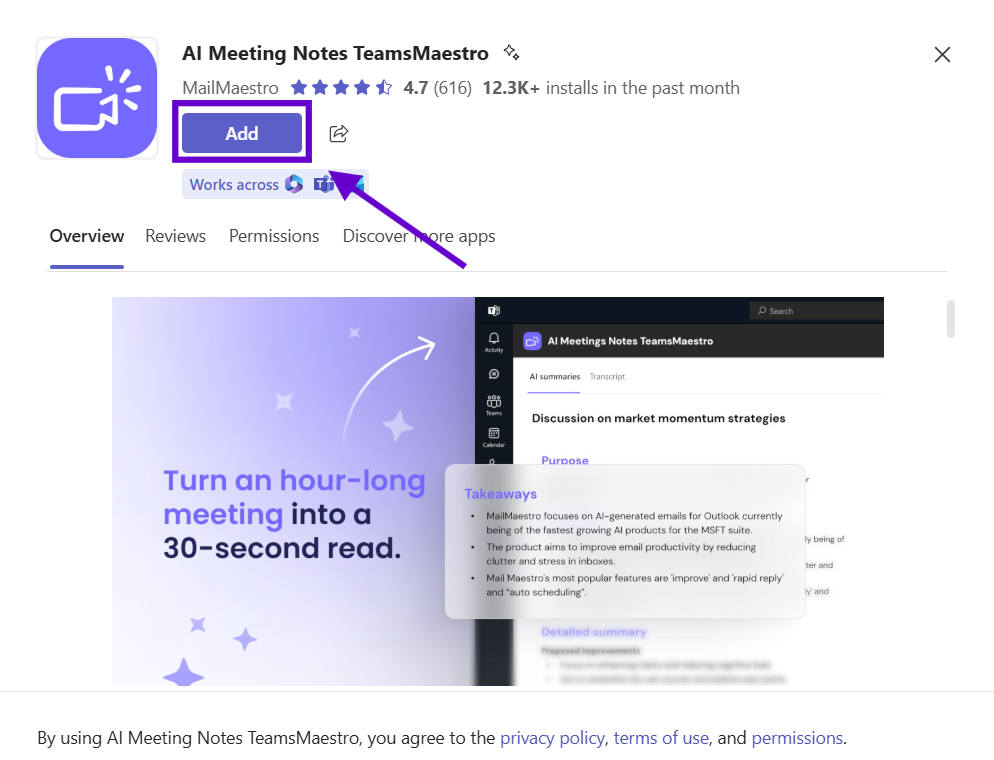
- Grant calendar access permissions when prompted
- Schedule a test meeting to verify that TeamsMaestro appears in your call
Pro Tip: TeamsMaestro's free tier includes ten meetings monthly, perfect for evaluating AI meeting notes before upgrading. The system learns your meeting patterns and terminology, improving summary quality over time.
Microsoft Teams Keyboard Shortcuts and Navigation Hacks
Efficient Teams navigation separates productive professionals from those who spend precious minutes clicking through menus and searching for basic functions. Microsoft embeds powerful keyboard shortcuts throughout Teams, but these time-saving features remain largely undiscovered.
4. Master Hidden Teams Keyboard Shortcuts for Lightning Navigation
Microsoft designed Teams with extensive keyboard support, but these shortcuts remain hidden from typical users. Unlike other Microsoft applications that display keyboard combinations prominently, Teams buries its most powerful shortcuts in help documentation that few professionals ever read. The most transformative shortcuts involve search commands that bypass traditional navigation entirely.
Essential Navigation Shortcuts:
- Use Ctrl + 1 (Activity), Ctrl + 2 (Chat), Ctrl + 3 (Teams), Ctrl + 4 (Calendar), Ctrl + 5 (Calls)
- Press Ctrl + E for instant universal search from any screen
- Use Ctrl + G (go to team), Ctrl + N (new chat), Ctrl + Shift + A (accept call)
- Control meetings with Ctrl + Shift + M (mute), Ctrl + Shift + O (camera toggle)
- Advanced Search Commands: Type "/call [person name]" for instant calling. Use "/goto [team name]" to jump directly to any team. Search files with "/files [keyword]" across all teams. Filter messages using "/messages from:[name]" to review communication history.
- Pro Meeting Controls: Start screen sharing with Ctrl + Shift + S. Begin recording with Ctrl + Shift + E. Open participant management using Ctrl + Shift + P.
Reminder: Mac users substitute Cmd for Ctrl in all combinations. These shortcuts work identically across operating systems, ensuring productivity techniques remain consistent regardless of hardware platform.
5. Teams Status Automation That Actually Works
Manual status updates consume more time than most professionals realize, creating constant interruptions to focused work. Teams offers sophisticated status automation that can eliminate manual updates while providing accurate availability information. However, these automation features are scattered across different settings menus, making them difficult to discover.
Step-by-Step Status Automation:
- Click profile picture → "Settings" → "Privacy" → Enable "Show when I'm in a meeting"
- Click your status → Choose any status → Click "Duration" → Select timeframe
- In Teams mobile app → "Settings" → "Notifications" → Enable "Update status when inactive"
- Create focus blocks in Outlook calendar - Teams automatically sets "Focusing" status
- Set quiet hours: Settings → "Notifications" → "Quiet hours" → Configure blocking times
Create custom status messages like "Deep work until 3 PM - urgent only." Schedule "Do Not Disturb" for recurring focus blocks. Enable location-based updates for automatic "Away" status when mobile detects inactivity.
Pro Tip: The "Do Not Disturb" status only allows urgent priority messages through, creating protected time for focused work. Train your team to use priority messaging appropriately for this system to work effectively.
6. Schedule Microsoft Teams Messages for Perfect Timing
The message scheduling feature hides behind a right-click menu that most users never discover. Even those who find it often don't realize its strategic applications for cross-timezone work and work-life balance. This feature becomes particularly powerful for professionals managing international teams or those who work outside standard business hours.
Step-by-Step Message Scheduling:
- Type your message in any Teams chat as normal
- Instead of pressing Enter, right-click the Send button (arrow icon)
- Select "Schedule send" from the context menu
- Choose timing from preset options or click "Custom time."
- Set a precise date and time using the calendar picker
- Click "Send at scheduled time" to confirm
- Manage scheduled messages in your chat - edit or cancel before sending
Schedule Monday morning messages during weekend planning sessions. Send messages to international teams during their business hours. Prepare follow-up reminders for project deadlines. Create urgent morning updates that arrive first thing when teams start work.
Reminder: Scheduled messages appear in chat history with clock icons indicating pending delivery. They can be edited or canceled until the scheduled send time arrives.
Professional Teams Meeting Management Strategies
Transform chaotic meetings into productive, outcome-driven sessions with advanced preparation and management techniques that ensure every meeting delivers measurable value.
7. Teams Meeting Preparation System for Guaranteed Results
Poor preparation represents the primary reason meetings become time-wasters, yet most professionals approach meetings without systematic preparation. This framework transforms meetings from necessary evils into productivity multipliers, but requires discipline that most people skip due to time pressures.
The 2-Minute Prep Framework:

- Define purpose (30 seconds): Write "We're meeting to [decide/review/plan/solve] X"
- Create a smart agenda (45 seconds): List topics with time allocations and decisions needed
- Gather context (30 seconds): Check recent chat history, last meeting notes, shared files
- Tech setup (15 seconds): Test camera/mic, close distractions, pin meeting chat
Pro Tip: Reserve the last five minutes for summarizing decisions, assigning ownership to action items, and scheduling follow-up meetings before participants disconnect. This "exit strategy" ensures meetings produce actionable outcomes rather than just discussion.
8. Advanced Teams Breakout Room Management for Better Collaboration
Most organizers create breakout rooms without structure, clear objectives, or active management, leading to unfocused discussions that waste time. This advanced approach transforms random small groups into focused, productive sessions that generate measurable results and maintain participant engagement throughout longer meetings.
Step-by-Step Breakout Room Setup:
- Plan before meeting: Determine optimal room count (3-5 people per room works best)
- During meeting, click "Breakout rooms" → "Create rooms"
- Choose assignment method: "Automatically," "Manually," or "Let participants choose"
- Configure settings: Set time limits and return permissions
- Brief participants with clear instructions before opening rooms
- Click "Start rooms" to begin breakout sessions
- Actively manage: Broadcast messages, visit rooms, send time warnings
- "Close rooms" brings everyone back for structured reporting
Reminder: Breakout rooms require clear deliverables and active facilitation. Give each room specific outcomes like "Prepare your top three recommendations in two minutes" to ensure focused discussions and productive reporting sessions.
9. Professional Teams Screen Sharing and Presentation Control
Users typically share entire screens with distracting notifications, personal files, and poor audio quality, making presentations look unprofessional. Professional screen sharing requires preparation and technical knowledge that most people never learn, yet these skills significantly impact how colleagues and clients perceive your competence.
Step-by-Step Professional Screen Sharing:
- Prepare content first: Open all applications and websites you'll need
- Clean your desktop: Hide personal files and close unnecessary applications
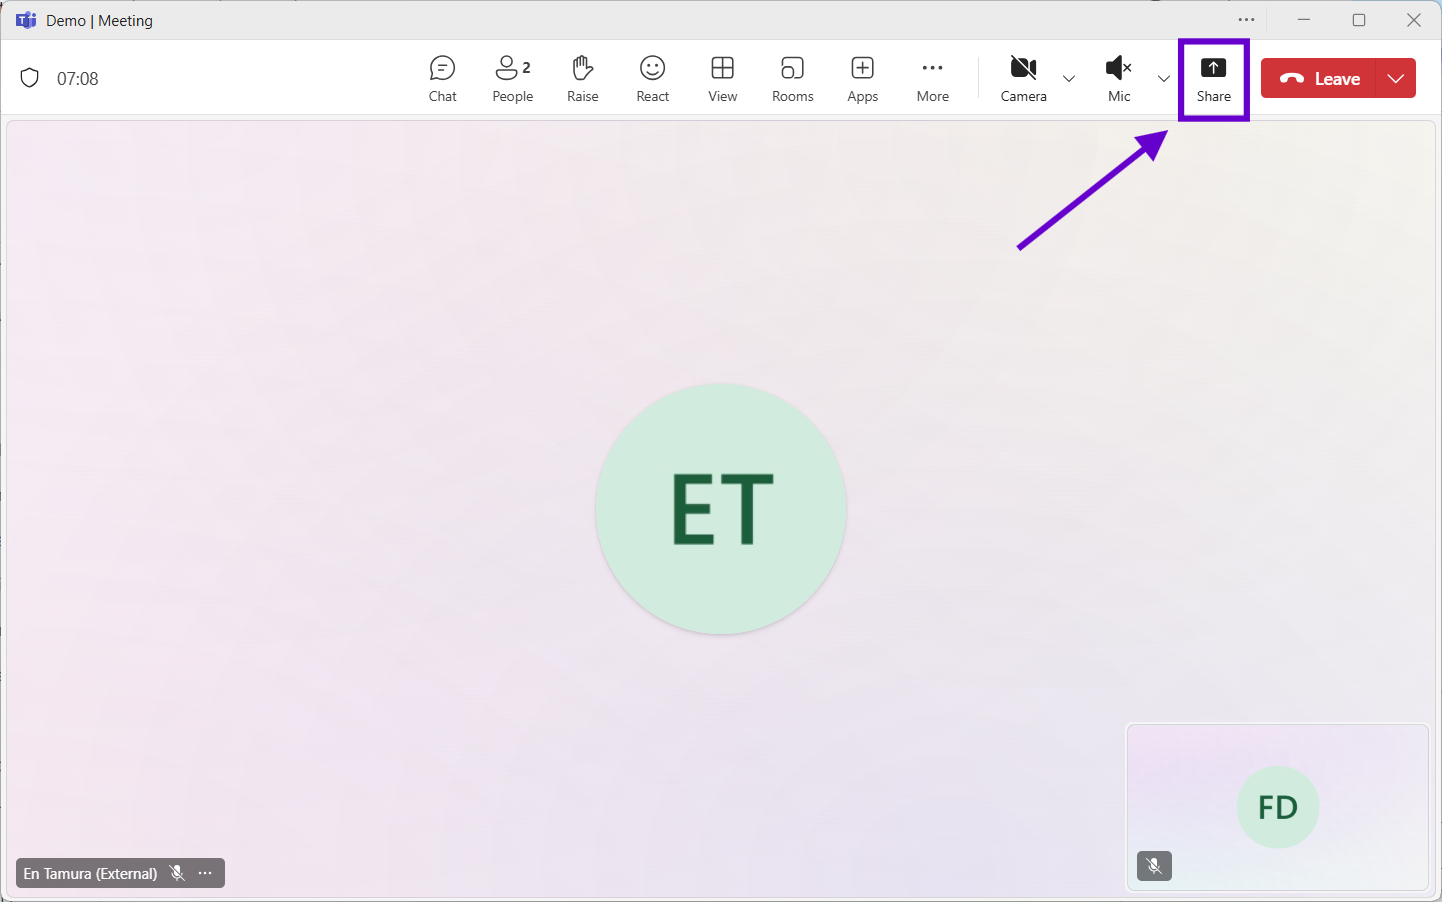
- Click "Share" button in meeting controls
- Choose sharing type: Screen or Window
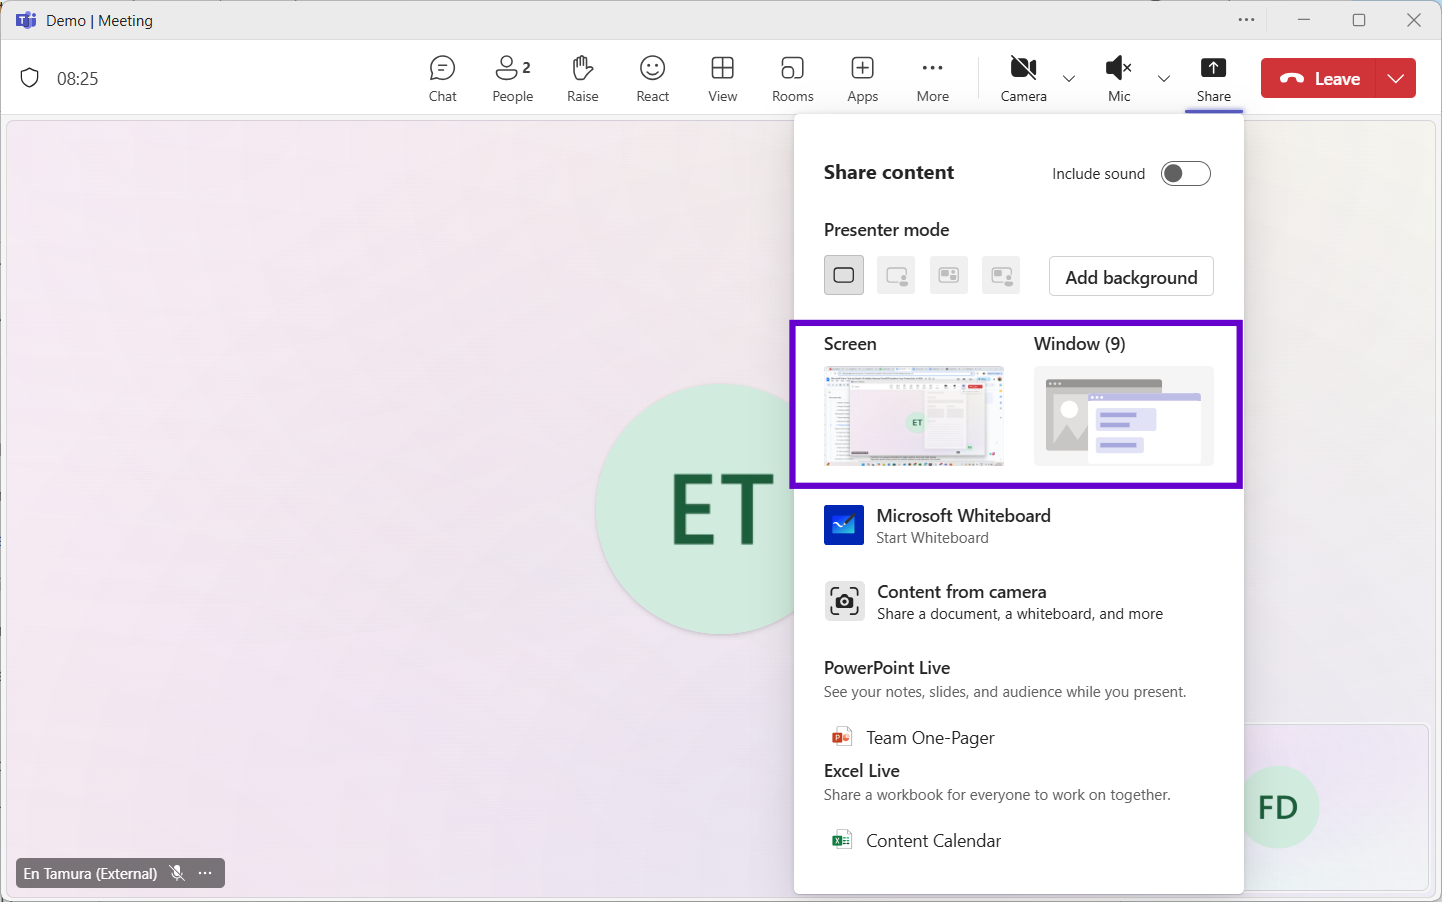
- Check "Include computer sound" if sharing audio content
- Test before presenting: Ask "Can everyone see this clearly?"
- Use annotation tools: Access pen, highlighter, and laser pointer from toolbar
- Click "Stop sharing" when finished
PowerPoint Live uploads presentations for better audience control and mobile viewing. Application-specific sharing shows only relevant windows to avoid distractions. Dual monitor setups allow sharing one screen while monitoring participants on another.
Pro Tip: Practice your sharing sequence beforehand. Know exactly which window or tab comes next, and use Alt + Tab for smooth transitions between applications during presentations.
Advanced Teams Collaboration and Engagement Features
Discover sophisticated capabilities that transform Teams from a basic collaboration tool into a comprehensive productivity platform, streamlining your entire workflow.
Conclusion: Your Next Steps to Teams Mastery
You now have 15 powerful Teams techniques that can save 45-90 minutes daily. Start with the hacks addressing your biggest pain points, whether that's meeting documentation, notification overload, or file organization chaos.
The biggest impact occurs when entire teams adopt these practices. Consider sharing favorite techniques with colleagues, hosting informal training sessions, or creating team knowledge bases. Microsoft continuously updates Teams, so stay current by experimenting with new features as they release.
Your Teams mastery journey begins with implementing one technique today. Pick the hack that solves your most pressing productivity challenge and build from there.
Languages we support
TeamsMaestro currently supports a wide range of languages for meeting summaries, transcripts, and AI responses — from English and Spanish to French, German, and many more. Our goal is to make every team’s communication experience seamless and inclusive, no matter the language.
If your preferred language isn’t supported yet, we’d love your feedback! Email us at feedback@maestrolabs.com to request new languages or share examples of what you’d like to see. Your input helps us shape the next updates of TeamsMaestro.
Final thoughts
Meeting summaries are no longer one-size-fits-all. With the Language and Template buttons in TeamsMaestro, you can create tailored, polished notes in seconds. Use these tools to communicate clearly, reduce follow-up work, and keep everyone aligned, wherever they are and however they work.
Languages we support
MailMaestro currently supports a growing range of languages for composing, summarizing, and improving your emails. From English and Spanish to French, German, and beyond — we’re expanding our capabilities to make AI communication accessible for everyone.
If your preferred language isn’t available yet, we’d love to hear from you! Email us at feedback@maestrolabs.com to request new language support or share specific examples. We’re continuously improving with your input.
Frequently Asked Questions


